Table of Contents
Introduction
Listen up, taco lovers and crunch connoisseurs! 🌮🔥 Your taco Tuesday just got a full-on glow-up. Say goodbye to sad, floppy lettuce wraps and hello to Keto Street Taco Cheese Shells—crispy, golden, lacy cheese shells that are totally edible, fully keto, and ready to cradle all your favorite fillings. Crunchy, cheesy, and photogenic AF, these shells are about to become your new taco-night obsession. 🥑✨
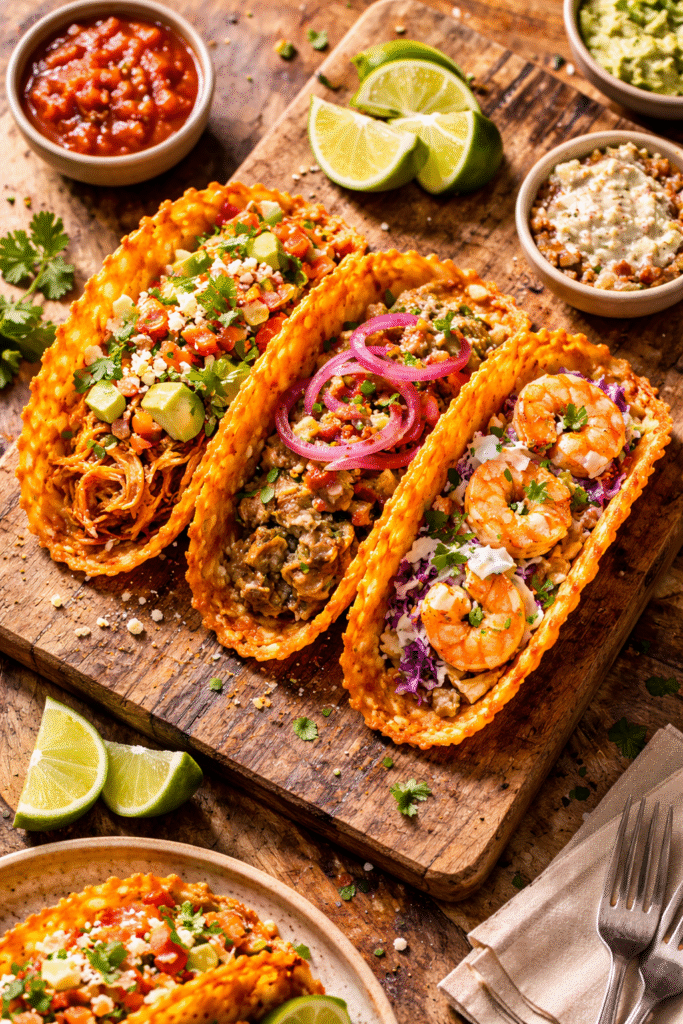
Picture this: perfectly baked cheese, golden around the edges, shaped into a classic taco while warm, just waiting for smoky chipotle-lime chicken, creamy avocado crema, and a sprinkle of fresh radish and cilantro. Every bite hits like a flavor explosion—the shatter of the shell, tender filling, cool toppings. It’s street-food energy meets at-home genius, perfect for build-your-own taco bars, family dinners, or solo taco indulgence that feels like a restaurant experience.
Why are these shells the keto trend everyone’s talking about? First, they’re ridiculously simple—just cheese and optional spices like paprika or chili powder. No more low-carb tortilla hunting or lettuce-wrap fails. Second, they’re fully customizable, so everyone can pick their protein, veggies, and toppings. Third, they’re Instagram- and Pinterest-ready—golden, lacy, crispy edges that pop on your feed, making taco night both delicious and visually stunning. 📸💚
Let’s talk flavor: these shells aren’t just crunchy—they’re umami-packed, lightly nutty, and perfectly seasoned. The baked cheese holds its crisp even under juicy toppings, creating that irresistible texture contrast everyone dreams of. High in protein and fat, they’re also satisfying and guilt-free—keto indulgence done right.
If you’re craving a low-carb, fun, and trendy taco night, these Keto Street Taco Cheese Shells are your answer. Minimal prep, maximum crunch, endless customization, and total viral potential. So grab your shredded cheese, preheat that oven, and get ready to ditch boring taco shells forever—your taste buds, feed, and keto goals will thank you. 🌮💖
Why You’ll Love This Recipe 🌮💖
If you’ve been missing that perfect taco crunch while sticking to keto, your prayers have been answered. These Keto Street Taco Cheese Shells bring back the crispy, golden texture that makes every bite feel like a mini celebration. Forget floppy low-carb tortillas—these shells shatter just right, hugging your fillings while staying sturdy enough for even the juiciest proteins.
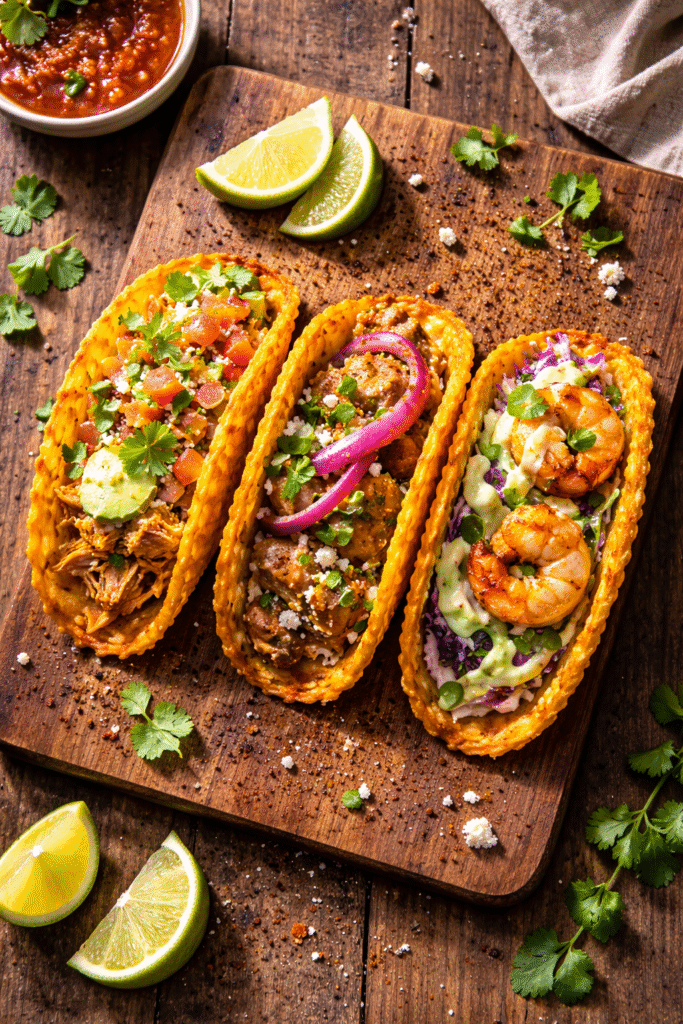
The best part? They’re totally customizable. Load them with chipotle-lime chicken, carnitas, grilled shrimp, or a veggie-packed cauliflower walnut “taco meat”. Top with radishes, avocado crema, shredded cheese, cilantro, or anything else your heart desires. Each taco becomes a little canvas for your flavor creativity, making dinner feel fun and interactive. Whether you’re hosting a taco night with friends, a cozy date night, or a family feast, everyone can build their own masterpiece—and trust us, it’s as satisfying to assemble as it is to devour.
These cheese shells are also super meal-prep friendly. Make a batch ahead of time, store them in an airtight container, and crisp them up in seconds whenever the taco craving hits. They’re convenient, low-carb, and totally stress-free—perfect for weeknight dinners or impromptu taco feasts.
And of course, they’re Instagram-ready. The golden, lacy edges paired with vibrant toppings make for taco photos that practically beg for double taps. Snap a pic, post it, and watch your feed light up with envy-inducing taco goals. Best of all, these shells are packed with protein and fat, keeping you satisfied while sticking to your low-carb lifestyle.
In short, these tacos aren’t just food—they’re fun, flavorful, and totally shareable. They hit every craving: crunchy, cheesy, customizable, and photogenic, all while staying keto-friendly. Your taco nights just leveled up, and honestly, you’re going to want to make these again and again. 🌮✨
Budget Information 💰
Let’s create a spectacular, protein-packed taco night that costs a fraction of takeout or store-bought keto tortillas!
- Shredded Cheese (2 cups / 224g): ~$3.00-$4.00 (cheddar, Monterey Jack, or a blend)
- Seasonings (paprika, chili powder, garlic powder): ~$0.25
- Protein (1 lb chicken, beef, or shrimp): ~$5.00-$8.00
- Toppings (avocado, sour cream, salsa, cilantro, lime): ~$3.00-$5.00
Approximate Total Cost: Around $11.00-$17.00 for 8-10 cheese shells (serves 3-4). That’s roughly $3.00-$5.00 per serving for a high-protein, low-carb taco night that would cost $15-20 per person at a restaurant. Plus, cheese shells cost pennies compared to specialty low-carb tortillas!
Why This Recipe Works 🧀🔥
This recipe is pure keto alchemy, bestie. When you bake shredded cheese at the right temperature, something magical happens. The cheese melts, bubbles, and the fats separate slightly, creating a lacy, golden-brown network of crispy, savory goodness. As it cools, it hardens into a rigid, shatteringly crisp shell that holds its shape perfectly.
The science is simple but brilliant. Cheese is mostly fat and protein. When heated, the fat melts and the proteins coagulate and brown (that’s the Maillard reaction, bestie!). As the moisture evaporates, what’s left is a thin, crispy, incredibly flavorful shell. Different cheeses behave differently—cheddar gives you that sharp, tangy flavor and deep golden color. Monterey Jack is milder and melts beautifully. Parmesan adds nuttiness and extra crispiness. A blend gives you the best of all worlds: flavor, color, and structure.
The oven method is foolproof. Parchment paper prevents sticking, and the even heat of the oven ensures consistent results every time. The hanger or rolling pin method for shaping the shells while they’re warm is the secret to that classic taco shape. Work quickly, because the cheese hardens fast!
These shells work with any protein because they’re neutral enough to complement all your favorite taco fillings. The salty, umami-rich cheese pairs beautifully with smoky, spicy, tangy, or creamy flavors. It’s the perfect vessel for your taco creativity.
Ingredients + Optional Substitutions 🛒
For the Cheese Shells:
- 2 cups (224g) Shredded Cheese: A blend of cheddar and Monterey Jack is PERFECT. Best cheeses: Cheddar, Monterey Jack, Pepper Jack, Gouda, Provolone, or a Mexican cheese blend. Avoid: Pre-shredded cheese with anti-caking agents (it won’t melt as well—shred your own if possible!).
- Optional Seasonings:
- 1/2 tsp Paprika or Smoked Paprika (for color and smokiness)
- 1/2 tsp Chili Powder (for warmth)
- 1/4 tsp Garlic Powder
- 1/4 tsp Cumin
- Pinch of Cayenne (for heat lovers!)
For the Chipotle-Lime Chicken Filling (Suggested):
- 1 lb (450g) Chicken Breast or Thighs, cooked and shredded
- 2 tbsp Chipotle Peppers in Adobo Sauce, minced
- 2 tbsp Lime Juice (about 1 lime)
- 1 tbsp Olive Oil
- 2 cloves Garlic, minced
- 1/4 cup Cilantro, chopped
- Salt and Pepper to taste
For Toppings (The Fun Part!):
- Avocado Crema or Guacamole
- Sour Cream or Greek Yogurt
- Pico de Gallo or Salsa
- Shredded Lettuce
- Fresh Cilantro
- Thinly Sliced Radishes
- Pickled Red Onions
- Crumbled Cotija or Queso Fresco
- Lime Wedges
- Hot Sauce
Equipment 🍳
- Baking Sheet
- Parchment Paper (NON-NEGOTIABLE—cheese will stick to foil or bare pans!)
- Measuring Cups and Spoons
- Cooling Rack (for shaping shells)
- Wooden Spoon Handle or Rolling Pin (for draping shells)
- Small Bowl (for seasoning mix)
- Spatula
Step-by-Step Recipe Instructions 👩🍳
Yield: 8-10 cheese shells (serves 3-4)
Step 1: Preheat and Prep Your Baking Sheet
Preheat your oven to 375°F (190°C) . This temperature is the sweet spot—hot enough to melt the cheese quickly and create those golden, crispy edges, but not so hot that the cheese burns before it crisps. Line a large baking sheet with parchment paper. Do NOT use wax paper or aluminum foil—the cheese will stick and you’ll be sad. Parchment paper is essential for easy removal.
Step 2: Prepare Your Seasoning Mix (Optional)
In a small bowl, combine your desired seasonings. A classic taco blend might include 1/2 tsp paprika, 1/2 tsp chili powder, 1/4 tsp garlic powder, and 1/4 tsp cumin. If you like heat, add a pinch of cayenne. This step is totally optional—plain cheese shells are still delicious—but the spices add beautiful color and depth of flavor.
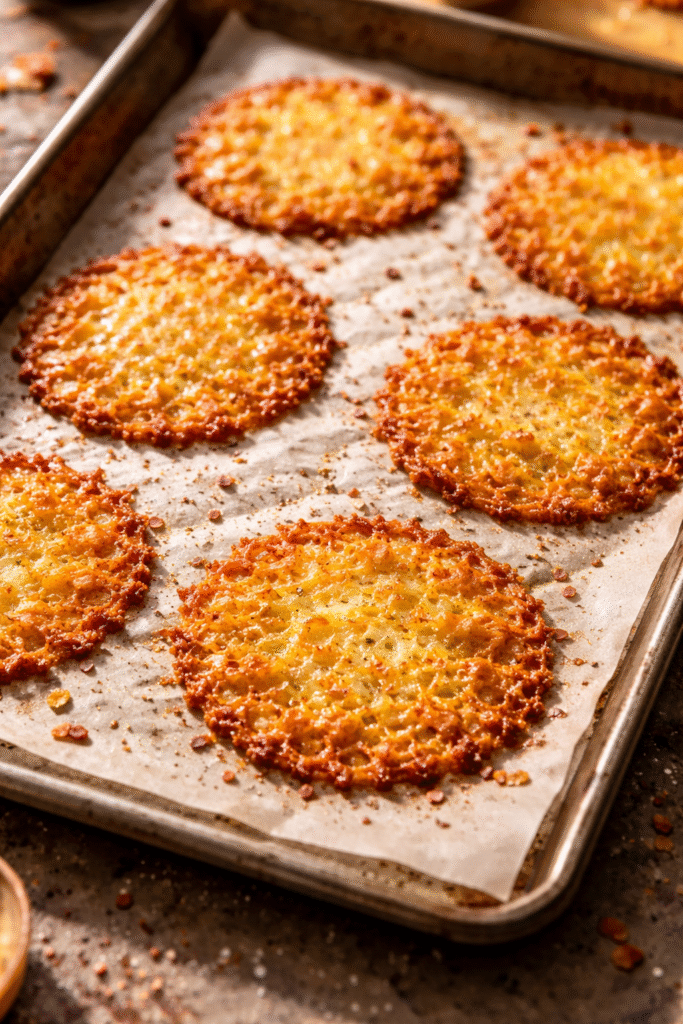
Step 3: Portion the Cheese onto the Baking Sheet
Using about 1/4 cup (28g) of shredded cheese per shell, create small, even mounds on the parchment-lined baking sheet. Space them at least 2 inches apart—they will spread significantly as they melt. Flatten each mound slightly with your fingers or the back of a spoon into a thin, even circle about 3-4 inches in diameter. The thinner and more even you spread them, the crispier the final shell will be. If you’re using seasonings, sprinkle a pinch over each cheese mound.
Step 4: Bake Until Golden and Lacy
Place the baking sheet in the preheated oven and bake for 6-8 minutes. Keep a close eye on them—oven temperatures vary! You’re looking for the cheese to be completely melted, bubbling, and golden brown around the edges with a lacy, craggy appearance. The center should be set but still pliable. If they’re pale, bake for another minute. If the edges are dark brown, they’re overdone (but still edible—just extra crispy!).
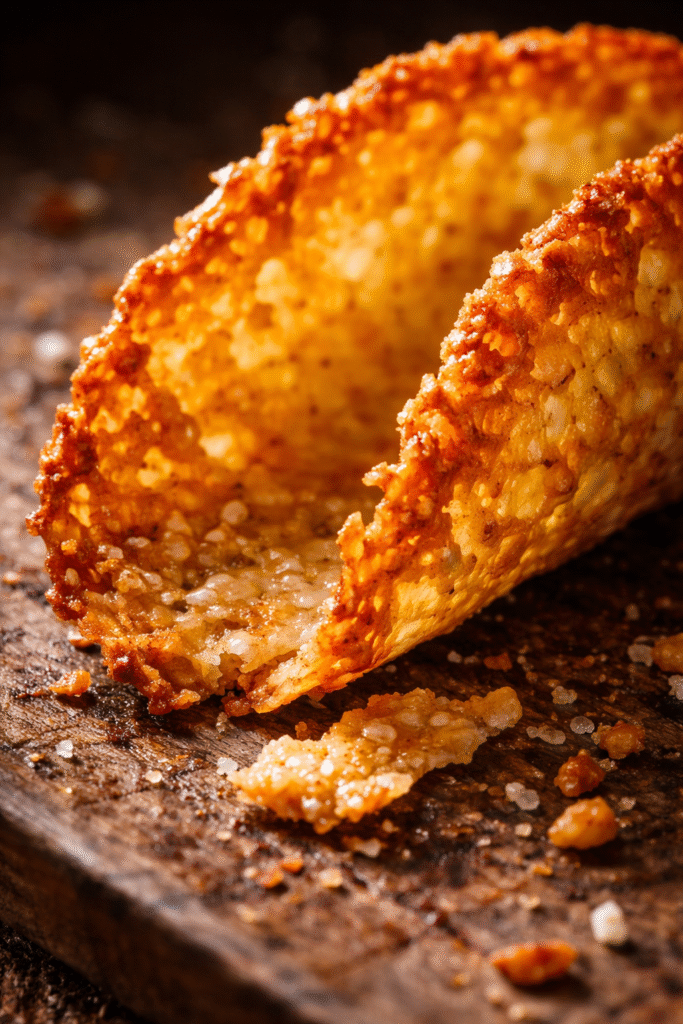
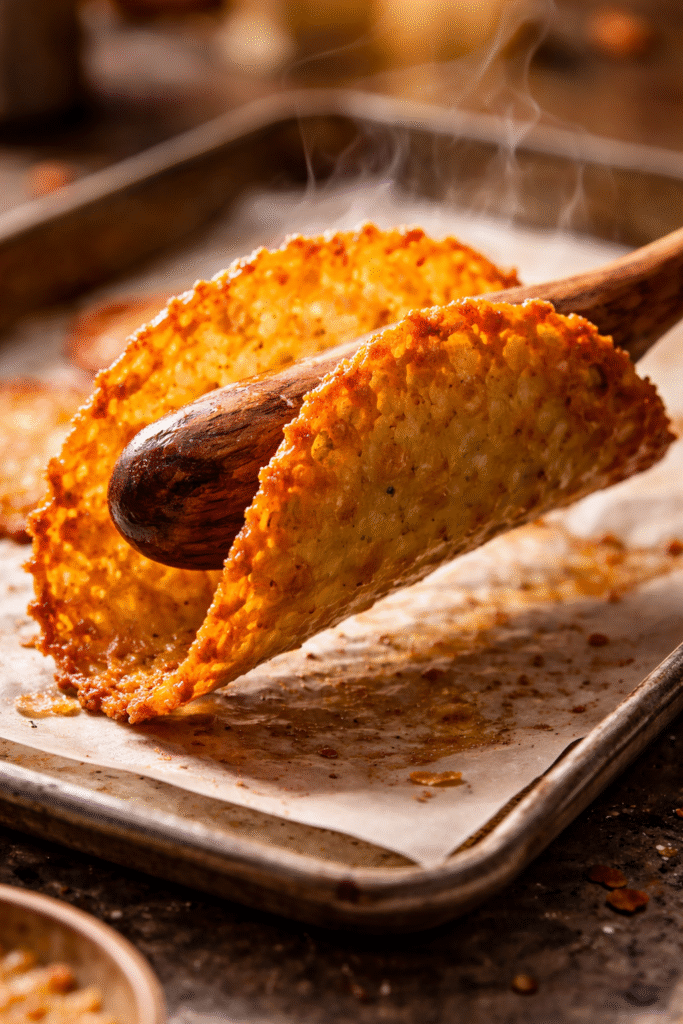
Step 5: Cool Slightly, Then Shape into Tacos
Remove the baking sheet from the oven and let the cheese rounds cool for 30-60 seconds—just long enough to set slightly but still be warm and flexible. Working quickly, use a thin spatula to lift one cheese round off the parchment paper. Immediately drape it over the handle of a wooden spoon, a rolling pin, or the edge of a cooling rack to create the classic taco shell shape. Let it cool and harden in this position for about 1-2 minutes. Repeat with the remaining cheese rounds. If a shell hardens before you shape it, pop it back in the oven for 30 seconds to soften.
Step 6: Make the Chipotle-Lime Chicken (While Shells Bake)
While your cheese shells are baking, prepare the filling. If you haven’t already, cook and shred 1 lb of chicken. In a bowl, combine the shredded chicken with 2 tbsp of minced chipotle peppers in adobo, 2 tbsp of lime juice, 1 tbsp of olive oil, 2 minced garlic cloves, 1/4 cup of chopped cilantro, and salt and pepper to taste. Mix well. You can also use this time to prep your toppings.
Step 7: Assemble Your Tacos
Once the cheese shells are completely cool and rigid, it’s time to build! Fill each shell with the chipotle-lime chicken. Top with your favorite toppings: a drizzle of avocado crema, a sprinkle of shredded lettuce, fresh cilantro, pico de gallo, crumbled cotija cheese, pickled red onions, and a squeeze of lime juice. Serve immediately while the shells are still crispy.
Prep Time: 10 minutes
Cook Time: 6-8 minutes per batch
Total Time: 20-25 minutes
Nutritional Facts 📊
(Per cheese shell, without fillings or toppings)
- Calories: ~110
- Protein: ~7g
- Fat: ~9g
- Carbohydrates: ~1g
- Fiber: ~0g
- Net Carbs: ~1g
*With chipotle-lime chicken and toppings, add approximately 150-200 calories and 15-20g protein per taco.*
Dietary Tags: Keto, Low-Carb, Gluten-Free, Grain-Free, High-Protein, Vegetarian-Optional.
Storage and Reheating Tips 📦
Storage: Store cooled cheese shells in an airtight container at room temperature for up to 3 days. Do NOT refrigerate—the shells will absorb moisture and become soft and chewy rather than crispy. Layer parchment paper between shells to prevent sticking.
Reheating for Best Results (Restoring Crispiness!):
- Oven (BEST METHOD): Reheat at 350°F (175°C) for 3-5 minutes on a parchment-lined baking sheet until crispy again.
- Air Fryer: Reheat at 350°F for 2-3 minutes.
- Microwave (NOT recommended): Makes the shells soft and chewy. Avoid if possible!
Freezing: I don’t recommend freezing cheese shells, as they become brittle and lose their texture. They’re so quick to make fresh that you won’t need to freeze them!
Serving Suggestions 🍽️
Serve these cheese shells immediately after filling for the ultimate crispy experience. They’re perfect for build-your-own taco bars—set out all the fillings and toppings and let everyone create their own masterpiece. For a full keto Mexican feast, serve alongside cauliflower rice, keto refried beans, grilled street corn salad (using keto-friendly ingredients), and sugar-free margaritas. These shells also make incredible taco salad bowls—just shape them into bowl forms instead of taco shapes!

Reader Tips & Helpful Notes 💡
- SHRED YOUR OWN CHEESE: Pre-shredded cheese contains anti-caking agents like cellulose and potato starch that prevent proper melting and crispiness. Shredding your own from a block takes 2 minutes and makes a HUGE difference.
- PARCHMENT PAPER IS NON-NEGOTIABLE: Cheese will stick to foil, wax paper, or bare pans. Parchment paper is essential for easy removal.
- DON’T OVERCROWD THE PAN: Leave at least 2 inches between cheese mounds—they spread significantly!
- WORK QUICKLY WHEN SHAPING: The cheese hardens fast as it cools. Have your spoon handle or rolling pin ready before you pull the shells out of the oven.
- USE A THIN SPATULA: A thin, flexible spatula is best for lifting the hot cheese rounds off the parchment without tearing them.
- IF THEY HARDEN BEFORE SHAPING: Pop them back in the oven for 20-30 seconds to soften. No stress!
- EXPERIMENT WITH CHEESE BLENDS: Cheddar + Monterey Jack is classic. Try Pepper Jack for heat, Gouda for smokiness, or Parmesan for extra crispiness.
- ADD SEASONINGS TO THE CHEESE: Sprinkle spices directly onto the cheese mounds before baking for beautifully colored, flavorful shells.
- COMMON MISTAKE – SHELLS ARE SOGGY: This happens if you add toppings that are too wet (like runny salsa) or let the shells sit too long before eating. Fill just before serving and pat wet toppings dry.
- COMMON MISTAKE – SHELLS ARE TOO GREASY: Some cheeses release more oil than others. Blot the baked shells gently with a paper towel before shaping if they seem greasy.
Recipe FAQs ❓
Q: Can I make these in the microwave?
A: You can make a single cheese shell in the microwave! Place 1/4 cup of shredded cheese in a thin, even circle on parchment paper. Microwave for 60-90 seconds until bubbly and golden. Shape immediately. Not recommended for batches.
Q: Can I use pre-shredded cheese?
A: You CAN, but the results won’t be as crispy. Pre-shredded cheese has anti-caking agents that prevent proper melting. Shred your own from a block for best results.
Q: What’s the best cheese for crispy shells?
A: Cheddar, Monterey Jack, Pepper Jack, Gouda, and Provolone all work beautifully. Harder cheeses like Parmesan add extra crispiness. Avoid soft cheeses like mozzarella or fresh cheeses like queso fresco—they won’t crisp up.
Q: Are these shells gluten-free?
A: YES! Made entirely from cheese and spices, these shells are naturally gluten-free. Just ensure your seasonings are certified gluten-free if you have sensitivities.
Q: Can I make these shells dairy-free?
A: Traditional cheese shells rely on dairy cheese for their structure. There are vegan cheese shreds available, but I haven’t tested them. Let me know if you experiment!
Q: Why did my shells stick to the parchment paper?
A: This can happen if the parchment paper was low quality or if the cheese wasn’t baked long enough. Use a good brand of parchment paper and bake until the cheese is golden and bubbling.
Q: Can I make larger shells for burritos?
A: YES! Use 1/2 cup of cheese per shell and spread into a 6-7 inch circle. Shape over a larger form (like a bowl or wide rolling pin).
Q: How do I get that perfect lacy edge?
A: Spread the cheese thinly and evenly. The thin edges will cook faster and create that beautiful, craggy, lacy texture.
Q: Can I add egg to make the shells more flexible?
A: You’re describing a different recipe (cheese + egg chaffles). For pure cheese shells, no egg needed. The cheese alone creates the perfect crispy shell.
Q: Are these shells keto-friendly?
A: YES! With only about 1g net carb per shell, they’re perfect for keto. Pair with high-protein, low-carb fillings for a complete keto meal.
Conclusion 🌮💖
And there you have it, bestie—the crispiest, cheesiest, most satisfying taco shells that are about to become your keto taco night SUPREMACY. These Keto Street Taco Cheese Shells are living proof that eating low-carb doesn’t mean sacrificing texture, flavor, or fun. That golden, lacy, shattering crunch, that umami-packed cheese flavor, that perfect vessel for all your favorite taco fillings—it’s everything you’ve been missing on your low-carb journey, brought back in the most delicious way possible.
The best part? You made them yourself, in minutes, with just one ingredient (okay, plus seasonings if you’re feeling fancy). That’s the kind of cooking that makes you feel like a total kitchen boss. No more hunting for expensive low-carb tortillas that taste like cardboard. No more sad, floppy lettuce wraps that fall apart in your hands. Just pure, crispy, cheesy taco perfection.
I am SO excited for you to make these and experience that first glorious, shattering bite. When you do, please tag me—I live for seeing your beautiful taco creations! Drop a comment below and tell me your favorite filling combo or if you tried a different cheese blend.
Now go forth, preheat that oven, shred that cheese, and make taco night EPIC again. You’ve got this, bestie! 🌮✨🧀
Printable Recipe Card
Want just the essential recipe details without scrolling through the article? Get our printable recipe card with just the ingredients and instructions.


Comments