Table of Contents
Introduction
There are snacks… and then there are the kind of snacks you start keeping in your freezer “just in case”—which secretly means you’re eating them straight from the tray at 11pm.
This is one of those.
Because sometimes you don’t want to choose between something that tastes like dessert and something that actually supports your goals. You want both. Cold, creamy, chocolate-covered, a little indulgent… but also secretly packed with protein and made from ingredients you can feel good about.
And that’s exactly what these Frozen Chocolate Covered Cottage Cheese Bites are.
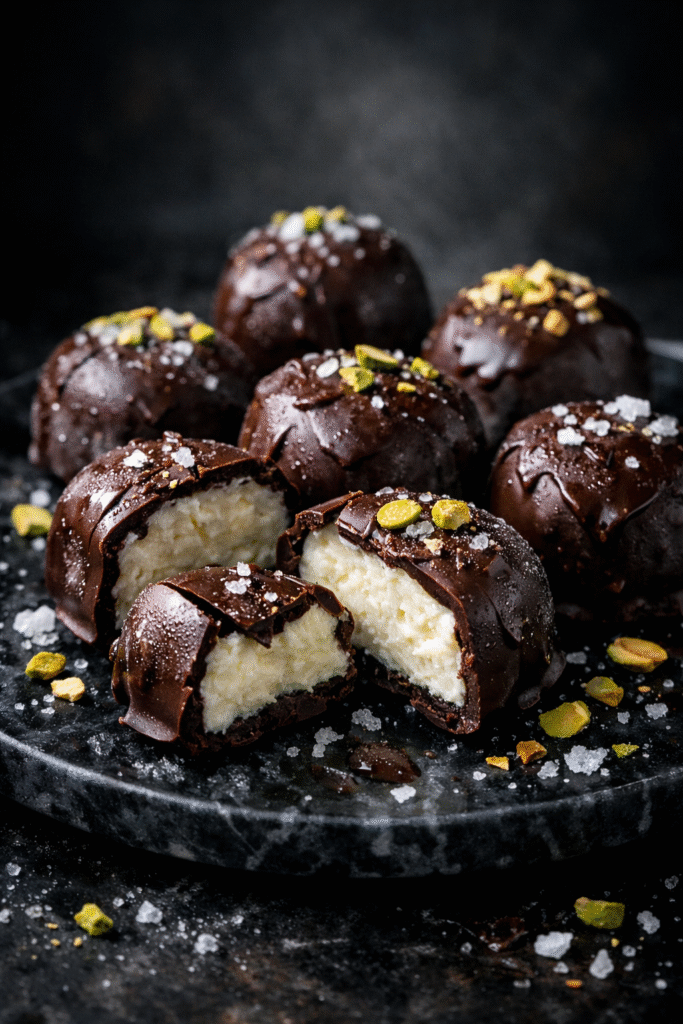
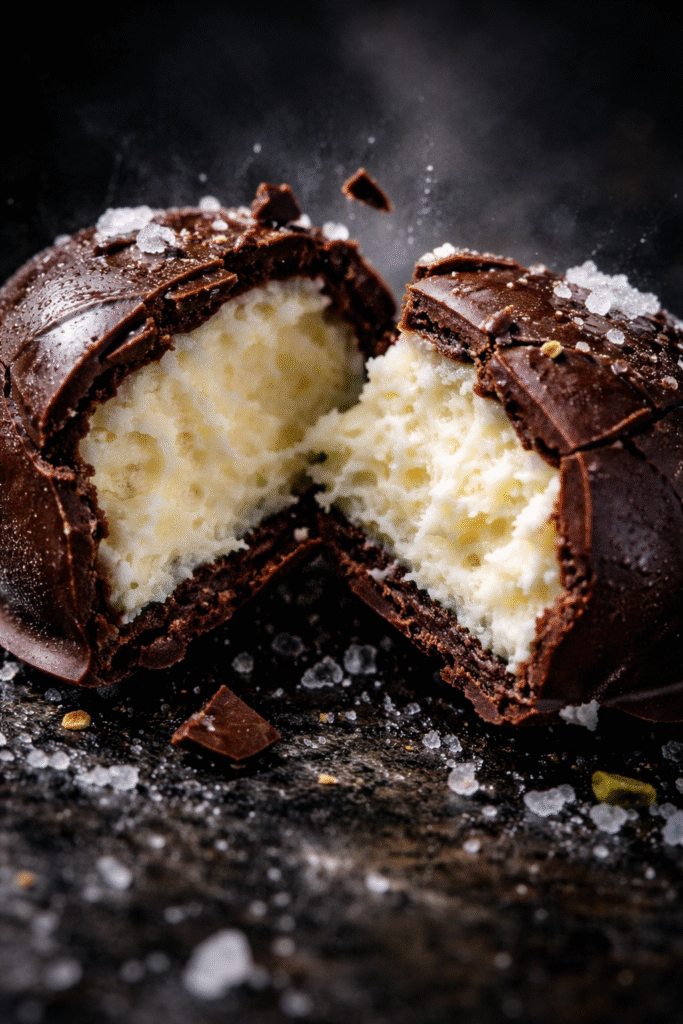
Think mini cheesecake-style bites—smooth, lightly sweetened cottage cheese frozen into soft little pillows, then dipped in a crisp shell of rich chocolate that shatters the second you bite into it. Cold, creamy center. Snappy chocolate coating. Zero baking. Minimal effort. Maximum payoff.
They feel like a treat you’d find in a fancy health café… except you made them in your kitchen in like 10 minutes.
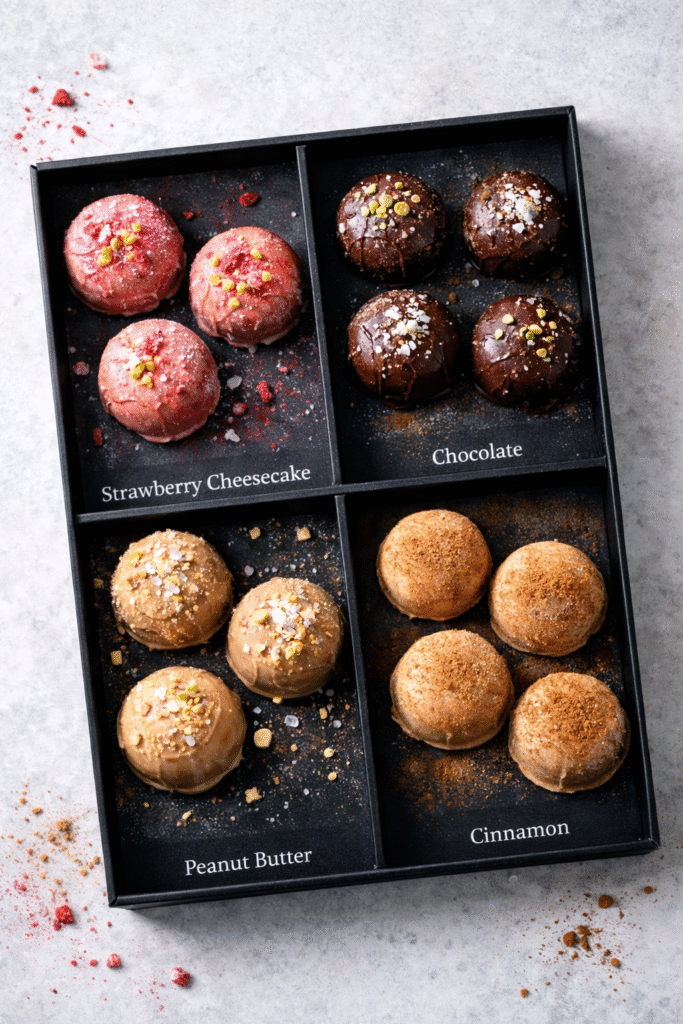
And the best part? You can customize them however you want. Strawberries for a cheesecake vibe. Peanut butter swirl for that salty-sweet hit. Coconut, nuts, sea salt—whatever your craving brain is asking for, these can match it.
They’re the kind of snack that quietly turns into a habit. The “just one more” kind. The “why are these already half gone?” kind.
So yeah… let’s make freezer magic happen 🧊🍫✨
Why You’ll Love This Recipe 🍫🧊✨
You’re going to be completely, dangerously obsessed with this recipe because it’s basically the perfect intersection of dessert and smart snacking.
It’s ridiculously simple—just a handful of ingredients, zero baking, and barely any effort—yet it somehow feels like you made something straight out of a fancy frozen dessert shop.
It’s perfect for meal prep, which means you can stock your freezer and have a high-protein treat waiting for you anytime a craving hits (future you is going to be very grateful).
It’s endlessly customizable too. You can switch up flavors, mix-ins, and coatings so every batch feels a little different—strawberry cheesecake one week, peanut butter cup the next, maybe even something coconutty and tropical after that.
And the texture? That’s the real magic. The snap of the chocolate shell giving way to a cold, creamy, cheesecake-like center is honestly addictive in the best way.
Plus, it’s packed with protein, naturally low-carb, keto-friendly if you use sugar-free chocolate, and gluten-free—so it hits that sweet spot where dessert actually works with your goals instead of against them.
Basically… it’s the kind of snack that makes “healthy eating” feel like a cheat code 🍫💪
Budget Information 💰🍫✨
Let’s turn this into a gourmet, high-protein frozen treat that tastes like something from a boutique snack shop—without the boutique price tag.
These Frozen Chocolate Covered Cottage Cheese Bites are shockingly affordable for how luxurious they taste, especially compared to store-bought protein bites or frozen desserts.
🛒 Ingredient Breakdown
Cottage Cheese (16 oz / 450g): ~$2.50–$3.50
Powdered Sweetener (1/4 cup): ~$0.50 (or maple syrup/honey depending on preference)
Vanilla Extract (1 tsp): ~$0.20
Sugar-Free or Dark Chocolate Chips (1 cup): ~$2.00–$3.00
Coconut Oil (1 tbsp): ~$0.20
Optional Mix-ins & Coatings: ~$1.00–$2.00
💸 Total Estimated Cost
≈ $6.50–$9.00 per batch
This makes about 20–25 bites, which breaks down to:
👉 ~$0.30–$0.45 per bite
📊 Why This Is a Win
Compare that to store-bought options:
- $2–$3 per protein bite
- $4–$6 for small frozen dessert packs
- Often with more sugar + fewer clean ingredients
Why This Recipe Works 🧪🍫🧊✨
This recipe is basically frozen dessert science doing the most—in the easiest way possible, bestie.
It starts with cottage cheese, which is the unexpected hero here. When you blend it until completely smooth, the curds disappear and it transforms into a thick, creamy, cheesecake-like base. That tangy richness is exactly what makes the bites taste more like frozen cheesecake or gelato than “healthy snack.”
The sweetener is doing quiet but important work too. Whether you use powdered erythritol, honey, maple syrup, or another option, it balances out the natural tang of the cottage cheese and keeps the flavor rounded, smooth, and dessert-like instead of savory.
Then comes the freezing step—and this is where the magic sets in. As the mixture freezes, it firms up into dense little scoops that hold their shape perfectly, making them ideal for dipping. It’s what gives you that creamy, almost truffle-like center once frozen.
And then the chocolate shell… honestly, that’s the drama moment.
Melted chocolate combined with a little coconut oil turns into a glossy, smooth coating that’s easy to dip and sets into that signature crackly snap when frozen. The coconut oil is doing double duty here—it loosens the chocolate just enough for a clean dip, then helps it harden into a shiny, professional-looking shell.
So when you bite in, you get that perfect contrast:
✨ cold, creamy cheesecake-like center
🍫 crisp chocolate shell that breaks cleanly
It’s simple ingredients behaving like a high-end frozen dessert… which is exactly why it feels so addictive.
Ingredients + Optional Substitutions 🍫🧊✨
🥣 For the Cottage Cheese Filling
This is your creamy, cheesecake-style base that makes the whole recipe work.
- 16 oz (450g) Full-Fat Cottage Cheese
The richer the cottage cheese, the creamier and more luxurious the texture.
Substitution: Low-fat works, but the bites will be less creamy. Avoid non-fat—it can turn icy once frozen. - 1/4 cup Powdered Sweetener (erythritol, allulose, or confectioners Swerve)
For smooth, even sweetness without grit.
Substitution: 3 tbsp maple syrup or honey (adds carbs but works beautifully) - 1 tsp Vanilla Extract
Adds warmth and classic dessert flavor. - Pinch of Sea Salt
Enhances sweetness and balances the chocolate.
🍓 Optional Flavor Variations (Mix into base)
Customize your bites depending on your craving:
- Strawberry Cheesecake: 2 tbsp freeze-dried strawberry powder + 1/2 tsp lemon zest
- Chocolate: 2 tbsp unsweetened cocoa powder + 1 extra tbsp sweetener
- Peanut Butter Cup: 1/4 cup powdered peanut butter (PBfit) + 1 tbsp water or milk
- Lemon: 2 tbsp lemon juice + 1 tbsp lemon zest
- Cinnamon Roll: 1 tsp cinnamon + 1/2 tsp nutmeg
🍫 For the Chocolate Shell
This is the snap, crackle, magic moment.
- 1 cup (170g) Sugar-Free or Dark Chocolate Chips (60–70% cocoa)
Substitution: Milk chocolate for sweeter bites, or any chocolate you prefer. - 1 tbsp Coconut Oil
Creates that glossy, snappy shell and helps chocolate melt smoothly.
Substitution: Butter or cocoa butter.
✨ Optional Coatings & Toppings (After Dipping)
For texture, crunch, and aesthetic glow-up:
- Crushed nuts (almonds, pecans, walnuts, pistachios)
- Unsweetened shredded coconut
- Sugar-free sprinkles
- Sea salt flakes (for salted chocolate vibe)
- Freeze-dried fruit powder (for color + flavor boost)
- Crushed sugar-free cookies or keto granola
Equipment 🧰🍫🧊
- Blender or Food Processor
Essential for turning cottage cheese into a completely smooth, creamy base with zero curds. - Rubber Spatula
For scraping every last bit of that creamy mixture (because nothing gets left behind 😌). - Small Cookie Scoop or Tablespoon
Helps portion uniform bites so they freeze evenly and look cute and consistent. - Baking Sheet
Used as your freezing tray to set the bites before dipping in chocolate. - Parchment Paper or Silicone Baking Mat
Prevents sticking and makes cleanup effortless. - Small, Deep Microwave-Safe Bowl
Ideal for melting chocolate evenly and making dipping easy without mess. - Fork or Dipping Tool
For dipping each frozen bite into chocolate and letting excess drip off cleanly. - Airtight Container
For storing your finished bites in the freezer so they stay fresh, firm, and snack-ready.
Step-by-Step Recipe Instructions 🍫🧊✨
Yield: 20–25 bites (depending on size)
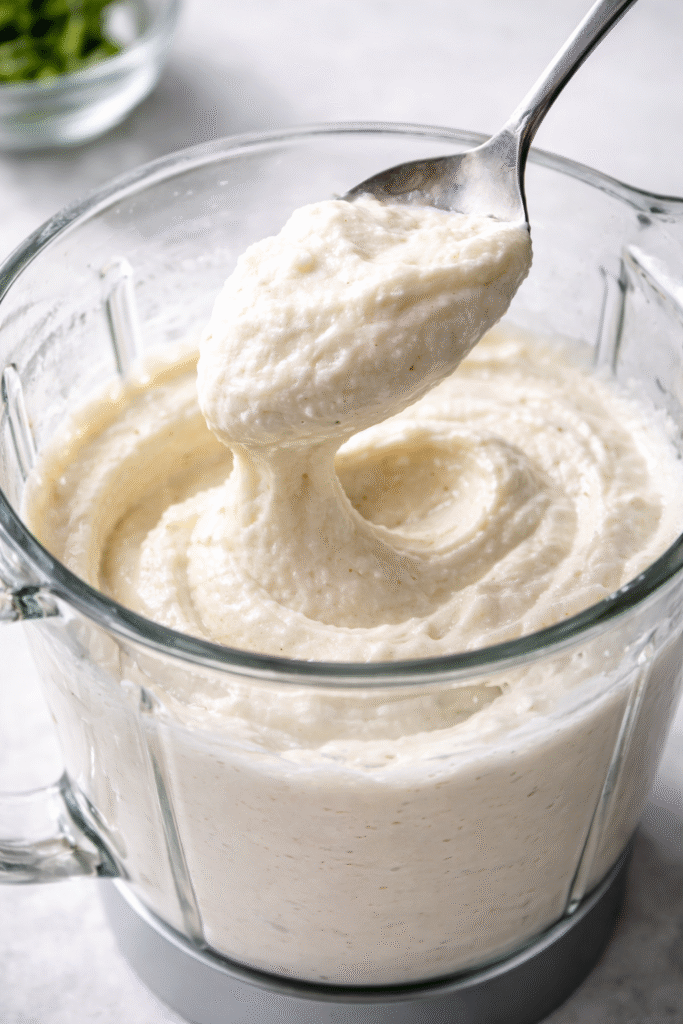
Step 1: Blend Until Ultra Smooth 🌀
This step makes or breaks the texture—no shortcuts, bestie.
Add cottage cheese, powdered sweetener, vanilla extract, and sea salt into a blender or food processor. If you’re using any flavor variations (like strawberry, chocolate, peanut butter, etc.), add them here too.
Blend on HIGH for 90–120 seconds, stopping once or twice to scrape down the sides.
You’re aiming for:
- Completely smooth
- No curds whatsoever
- Thick pudding or cheesecake batter consistency
This is what gives you that creamy, dreamy frozen center.
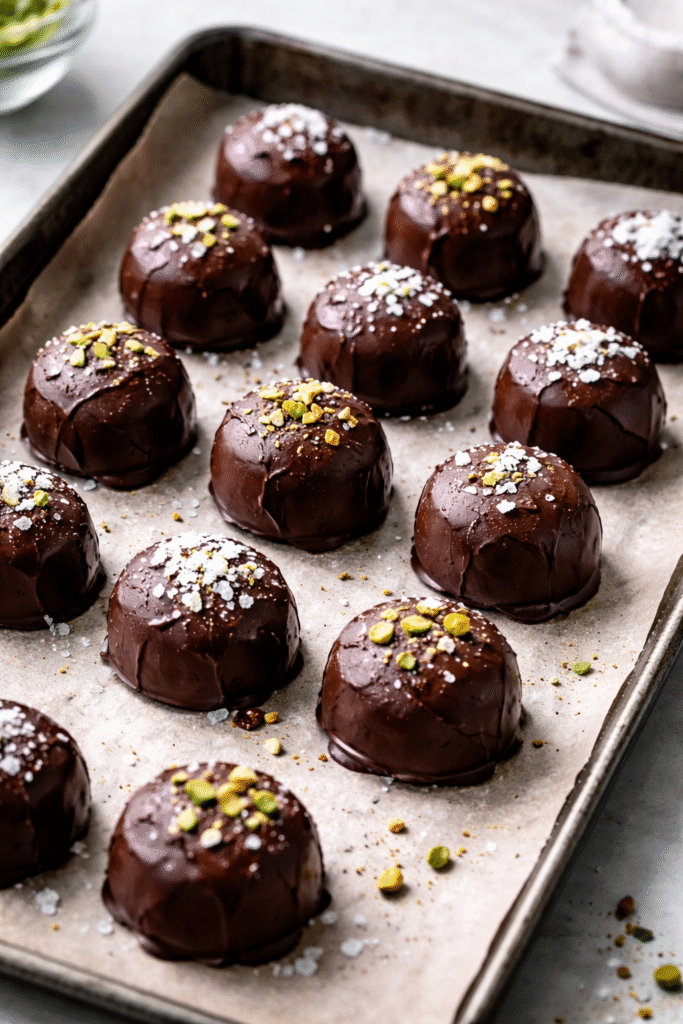
Step 2: Portion & Freeze ❄️
Line a baking sheet with parchment paper or a silicone mat.
Using a small cookie scoop or tablespoon:
- Scoop ~1 tbsp portions
- Drop onto tray in small mounds (~1 inch wide)
- Space them slightly apart
Optional: lightly wet your fingers to shape them neatly.
Freeze for:
- 2 hours minimum (until solid)
- Overnight = even better
They must be completely firm before dipping.
Step 3: Melt the Chocolate 🍫
In a small deep microwave-safe bowl, combine:
- Chocolate chips
- Coconut oil
Microwave in 20-second intervals, stirring each time until smooth (about 60–90 seconds total).
Key tips:
- Don’t overheat (chocolate can seize)
- Stir thoroughly between rounds
- Coconut oil = glossy, snappy coating
Step 4: Dip the Frozen Bites 🧊🍫
Work in small batches (3–4 at a time) so the rest stay frozen.
Using a fork or dipping tool:
- Drop a frozen bite into chocolate
- Roll until fully coated
- Lift and let excess drip off
Then place back onto parchment-lined tray.
If adding toppings:
- Sprinkle immediately before chocolate sets
If chocolate thickens:
- Reheat for 10–15 seconds
Step 5: Set the Chocolate Shell ❄️✨
Return tray to freezer for:
- 10–15 minutes
This locks in that crisp, crackly shell thanks to the coconut oil.
Or:
- Refrigerate for ~20 minutes if needed faster
Step 6: Serve & Store 🍫💛
Once set, transfer bites to an airtight container and store in the freezer.
Best way to enjoy:
- Straight from the freezer for a snappy shell + creamy center
- Let sit 1–2 minutes at room temp for a softer bite
⏱️ Timing Overview
- Prep time: ~10 minutes
- Freeze time: 2 hours (bites) + 15 minutes (set chocolate)
- Total: ~2 hours 25 minutes (mostly hands-off magic)
Nutritional Facts 📊🍫🧊
(Per bite — based on 22 bites, using sugar-free chocolate + powdered sweetener)
- Calories: ~65 kcal
- Protein: ~4g 💪
- Carbohydrates: ~3g
- Fiber: ~1.5g
- Net Carbs: ~1.5g
- Fat: ~4.5g
- Sugar: ~0.5g
🍯 If using regular chocolate + honey/maple syrup:
- Calories: ~85 kcal
- Net Carbs: ~8g
🏷️ Dietary Tags
Keto-Friendly (with sugar-free ingredients) • Low-Carb • Gluten-Free • High-Protein • Vegetarian
Storage & Serving Tips 🧊🍫✨
Storage ❄️
Store your Frozen Chocolate Covered Cottage Cheese Bites in an airtight container in the freezer for up to 2–3 months.
For best results:
- Place parchment paper between layers
- This prevents sticking and keeps the chocolate shells intact
Serving 🍫
These bites are meant to be enjoyed straight from the freezer—that’s where the magic texture lives.
- No thawing required
- No reheating needed
If you prefer a slightly softer center:
- Let sit at room temperature for 1–2 minutes before eating
Important Note ⚠️
If stored for longer periods, you may notice a light white coating on the chocolate (called “chocolate bloom”).
This is:
- Totally normal
- Completely safe to eat
- Just a natural shift in cocoa butter from temperature changes
Reader Tips & Helpful Notes 💡❄️🍫
These little details make the difference between “good snack” and absolute freezer obsession—don’t skip them!
🌀 Blend Until Completely Silky (Non-Negotiable)
This is the #1 rule of the entire recipe.
If you still see cottage cheese curds, they will freeze into icy chunks.
👉 Blend for a full 90–120 seconds minimum, scraping down the sides as needed.
You want a texture that looks like cheesecake batter, not cottage cheese.
🥄 Full-Fat = Creamier Magic
Full-fat cottage cheese gives you:
- A richer, creamier bite
- Less icy texture
- More “frozen cheesecake” vibes
Low-fat works in a pinch, but it won’t be as luxurious.
🍬 Use Powdered Sweetener for Smooth Texture
Granulated sweeteners can stay gritty after freezing.
👉 Best option: powdered erythritol, allulose, or monk fruit blends
👉 If you only have granulated: blitz it in a coffee grinder first
❄️ Freeze Until ROCK SOLID Before Dipping
This step matters more than it sounds.
If the centers aren’t fully frozen:
- They’ll melt into the chocolate
- Or fall apart while dipping
👉 Minimum: 2 hours
👉 Ideal: overnight freeze for perfect results
🥥 Don’t Skip the Coconut Oil
This is your secret weapon.
It:
- Thins the chocolate for easy dipping
- Helps it coat smoothly
- Creates that glossy, snap-worthy shell
It’s doing way more than you think.
⚡ Work in Small Batches
Keep most bites in the freezer and only take out a few at a time.
Frozen + warm hands + melted chocolate = chaos 😭
Small batches = clean, pretty coating every time.
🥣 Use a Deep Dipping Bowl
A narrow, deep bowl (like a mug or small ramekin) makes dipping:
- Cleaner
- Easier
- Less wasteful
Wide bowls make chocolate pooling and mess way worse.
✨ Toppings Must Be Immediate
If you’re adding nuts, coconut, sprinkles, etc.:
👉 Add them immediately after dipping
Chocolate sets FAST thanks to coconut oil, so timing is everything.
🍫 Fixing Chocolate Issues
- Too thick? Add a little more coconut oil + rewarm briefly
- Too hot? Let it cool for 1–2 minutes before dipping
- Grainy? It may have overheated—go slower next batch
🧊 Fixing Cottage Cheese Mixture Issues
Rare, but if your base is too runny:
- Add 2–3 tbsp powdered sweetener OR protein powder
- Blend again briefly before freezing
Recipe FAQs ❄️🍫💛
🤍 Q: Can I taste the cottage cheese in these bites?
A: Not at all! Once it’s fully blended with vanilla and sweetener, the cottage cheese completely transforms into a creamy, cheesecake-like base. Most people would never guess the secret ingredient.
🥄 Q: Can I make these dairy-free?
A: You can try! Dairy-free cottage cheese alternatives or blended silken tofu are the closest swaps. Texture may vary slightly, so it’s a bit of an experiment—but still very doable.
🥣 Q: Can I use Greek yogurt instead?
A: Yes! Greek yogurt works really well, but the texture shifts more toward frozen yogurt bites rather than cheesecake-style bites. It also tends to be a bit softer once frozen.
⚙️ Q: Can I make these without a blender?
A: You can, but it’s not ideal. An immersion blender or food processor works best. Without a blender, you’ll likely get a slightly lumpier texture—but still edible and tasty if you don’t mind a rustic vibe.
🧊 Q: Why are my bites icy instead of creamy?
A: This usually happens when:
- Low-fat or non-fat cottage cheese is used
- The mixture wasn’t blended enough
- The texture had too much water content
👉 Full-fat + thorough blending = creamy, cheesecake-like results.
🍫 Q: Can I use milk or white chocolate instead of dark?
A: Absolutely!
- Milk chocolate = sweeter, more dessert-like
- White chocolate = extra creamy and indulgent
Just note they’ll be higher in sugar and a bit softer than dark chocolate shells.
✨ Q: My chocolate shell isn’t snappy—what went wrong?
A: The most common causes are:
- Not enough coconut oil
- Chocolate overheated or not smooth enough
👉 Try adding a bit more coconut oil next time (up to 1.5 tbsp) for a thinner, crispier shell.
💪 Q: Can I add protein powder?
A: Yes! Add 1 scoop of vanilla or unflavored protein powder.
If the mixture becomes too thick, loosen it with 1–2 tbsp of milk or water until it’s smooth and scoopable again.
🥑 Q: Are these keto-friendly?
A: Yes—when made with:
- Sugar-free chocolate
- Keto-friendly sweetener (erythritol, allulose, monk fruit)
👉 They usually land around ~1.5g net carbs per bite.
🧊 Q: How long do they last in the freezer?
A: About 2–3 months in an airtight container… but realistically? They tend to disappear way before that 😌❄️
Conclusion 🍫❄️💛
And there you have it—the most addictive, protein-packed frozen treat that’s basically guaranteed to earn a permanent spot in your freezer.
These Frozen Chocolate Covered Cottage Cheese Bites prove that “healthy snack” doesn’t have to mean boring, restrictive, or uninspiring. Quite the opposite—this is creamy, chocolatey, snap-worthy indulgence with a nourishing twist. That moment when the chocolate shell cracks and you hit the cold, cheesecake-like center? Honestly… it’s borderline unfair how good that feels.
The best part is how effortless it all is. Simple ingredients, minimal prep, and a process that feels more like a fun little kitchen moment than actual cooking. No complicated steps, no fuss—just a batch of homemade bites you can feel really good about keeping on hand.
I genuinely can’t wait for you to try these and start experimenting with all the different flavor combos and toppings. When you do, I’d love to hear what you came up with—those variations are always the most fun part.
Now go ahead, stock that freezer, and enjoy having a high-protein treat ready whenever a craving hits. You’ve absolutely got this 💪✨
Printable Recipe Card
Want just the essential recipe details without scrolling through the article? Get our printable recipe card with just the ingredients and instructions.


Comments