Table of Contents
Introduction
Okay bestie… this is not your average “healthy dessert.” This is the Keto Cottage Cheese Protein Oreo Cheesecake Cups (15g Protein, No-Bake, Low-Carb!) moment. The one that tastes like a full-on cheat dessert but secretly hits your protein goals and keeps you on track.
You know that feeling when you open a fresh pack of Oreos, twist them apart, and go straight for that creamy center? Yeah… we’re recreating that exact vibe—cookies-and-cream perfection, rich cheesecake energy, chocolatey crunch—but without the sugar crash or post-dessert regret.
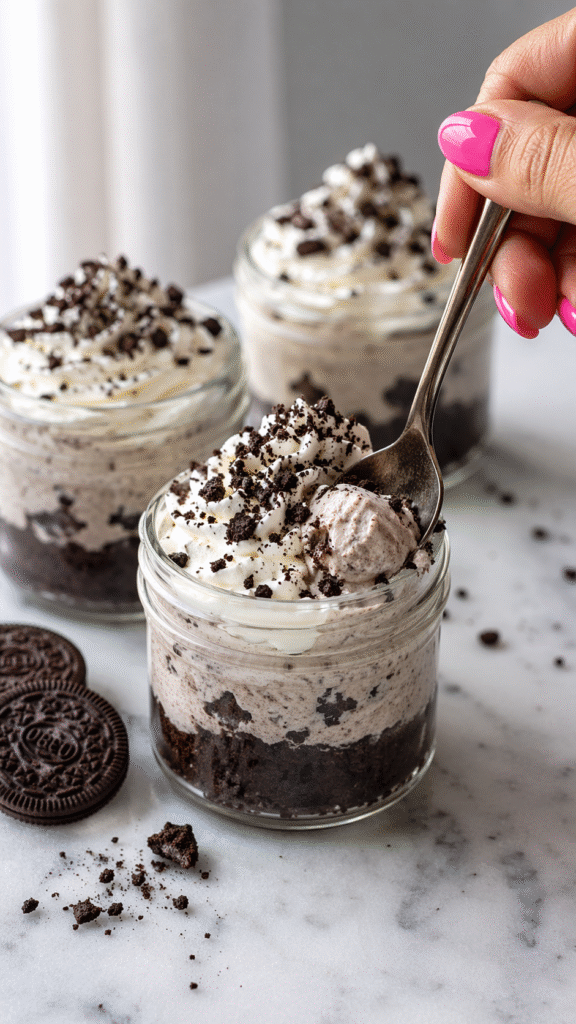
Introducing Cottage Cheese Protein Oreo Cheesecake Cups. Imagine this: a crunchy, chocolatey “Oreo” crust made from crushed keto chocolate cookies, topped with a silky, creamy, protein-packed cheesecake filling that tastes EXACTLY like the real thing. Then, swirled throughout are chunks of more crushed keto Oreos, giving you that iconic cookies-and-cream moment in every single bite. No baking, no water bath, no stress—just blend, layer, chill, and devour. ✨
But here’s the plot twist. The cheesecake filling is made from cottage cheese. I know. Stay with me. When you blend it until completely smooth with cream cheese, sweetener, and vanilla, it transforms into the most insanely creamy, rich, dessert-worthy filling. You won’t taste “healthy”—you’ll taste obsessed.
And these aren’t just “good for keto” cheesecakes. These are legit Oreo cheesecake cups. Creamy, crunchy, chocolatey, and low-carb enough to keep you feeling good after. Perfect for meal prep, late-night sweet cravings, or pulling out when you want to impress people without actually trying that hard.
So grab your blender, your keto Oreos, and let’s make some no-bake magic. 🍪✨
💖 Why You’ll Love This Recipe
I’m not even being dramatic—you’re about to be fully obsessed with these.
This recipe is the ultimate high-protein, no-bake dessert hack. Like… it tastes like something you’d order at a restaurant, but you made it in your kitchen in under 15 minutes.
✨ Creamy cheesecake energy
We’re talking silky smooth, rich, and luscious. No weird texture, no graininess—just straight-up cheesecake vibes.
🍪 Cookies & cream in every bite
That chocolatey crunch + creamy filling combo? Yeah, it hits every single time.
💪 15g protein per cup
A dessert that actually helps you hit your goals? We love a productive sweet treat.
🥑 Low-carb + keto-friendly
Only 4–5g net carbs per cup, so you can indulge without the crash.
⏱ No-bake & ridiculously easy
Blend, layer, chill, done. No oven, no stress, no chaos.
📦 Perfect for meal prep
Make a batch, store in the fridge, and you’ve got a grab-and-go dessert for days.
At the end of the day, this isn’t just a “healthy version” of cheesecake… it’s the real deal experience—creamy, crunchy, chocolatey, and low-key addictive 😌🍫
💸 Budget Information
Let’s make a high-protein dessert moment that tastes expensive… but isn’t.
Here’s the breakdown:
- 🧀 Cottage Cheese (1 cup / 240g): ~$1.50–$2.50
- 🍰 Cream Cheese (4 oz / 113g): ~$1.00
- 🍪 Keto Chocolate Sandwich Cookies (8–10): ~$2.00–$3.00
- 🍬 Powdered Sweetener (1/4 cup): ~$0.50
- 🍋 Vanilla Extract + Lemon Juice: ~$0.25
- 🥛 Heavy Cream (optional): ~$0.50
💰 Total Cost: ~$5.75–$7.75 for 4 generous cheesecake cups
💡 Per Cup: ~$1.50–$2.00
Now let’s be real for a second…
A single slice of cheesecake from a bakery? Easily $6–$8 (and zero protein benefits 😭).
Meanwhile, you’re over here making 4 protein-packed, low-carb cheesecake cups for the same price—with better ingredients and macros that actually support your goals.
Financially responsible… and dessert obsessed?
We love this for you 🫶✨
🧠 Why This Recipe Works
This recipe is low-key a no-bake keto dessert hack—and once you get it, you’ll want to use it for everything.
The real MVP here? Cottage cheese. When blended until completely smooth with cream cheese, it transforms into a silky, creamy base that literally mimics traditional cheesecake filling. No lumps, no weird texture—just rich, luscious cheesecake energy with a protein boost. 💪
The cream cheese brings that classic tangy flavor and helps the filling firm up perfectly in the fridge, while the powdered sweetener melts right in—so you get pure sweetness without any graininess.
Now let’s talk about the best part… 🍪
The keto Oreo crust + mix-ins are doing all the heavy lifting for flavor and texture. Crushed chocolate sandwich cookies create a rich, buttery base that holds together beautifully, while extra cookie chunks folded into the filling give you that iconic cookies-and-cream bite every time.
And the no-bake method? Elite.
No water bath, no cracking, no stress. Just blend, layer, chill, and you’re done. The filling sets up into a perfectly creamy, scoopable cheesecake that tastes like it took hours… but was actually a 10-minute situation.
Effortless, high-protein, and dangerously good 😌✨
🛒 Ingredients + Optional Substitutions
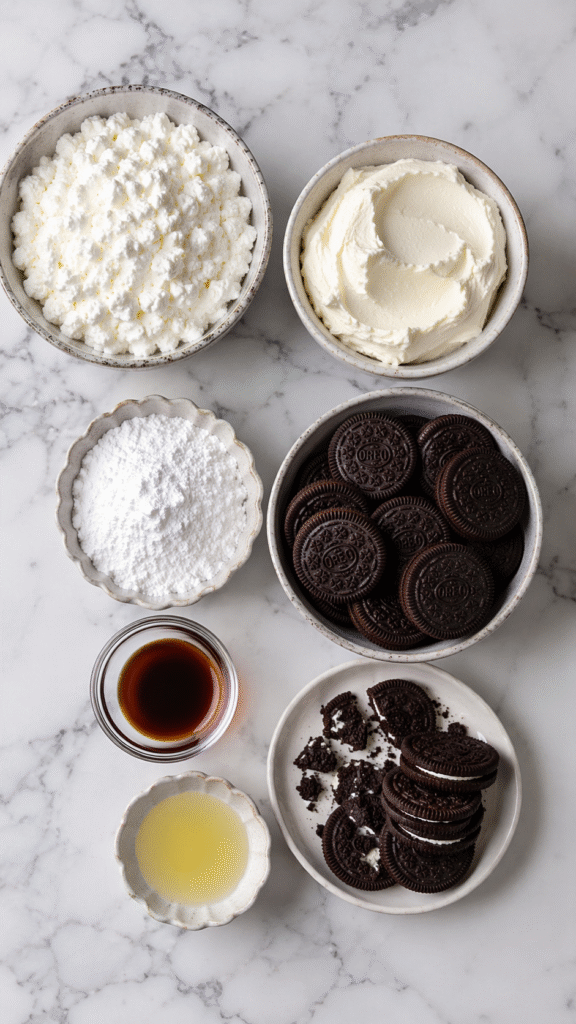
🍪 For the Keto Oreo Crust
- 6 Keto Chocolate Sandwich Cookies (HighKey, Catalina Crunch, ChocZero) – crushed into fine crumbs
- 2 tbsp Melted Butter or Coconut Oil – helps bind everything together
🍰 For the Cottage Cheese Cheesecake Filling
- 1 cup (240g) Full-Fat Cottage Cheese – ultra creamy when blended
Sub: Low-fat works, just slightly less rich - 4 oz (113g) Cream Cheese, softened – adds that classic cheesecake tang
- 1/4 cup Powdered Sweetener (erythritol, allulose, or monk fruit) –
Pro tip: powdered = no grainy texture - 1 tsp Vanilla Extract
- 1/2 tsp Lemon Juice – tiny amount, BIG flavor boost
- 1/4 cup Heavy Cream (optional) – for extra fluffiness + volume
🍫 For the Cookies & Cream Swirl
- 2–3 Keto Chocolate Sandwich Cookies, crushed into chunks
✨ Optional Garnishes (but highly recommended)
- Sugar-free whipped cream
- Crushed keto Oreo crumbs
- Sugar-free chocolate shavings
🧰 Equipment
- Blender or Food Processor – key for that smooth, silky filling
- Small Bowl – for the crust
- Mixing Bowl – for combining everything
- Rubber Spatula – don’t waste a drop 😌
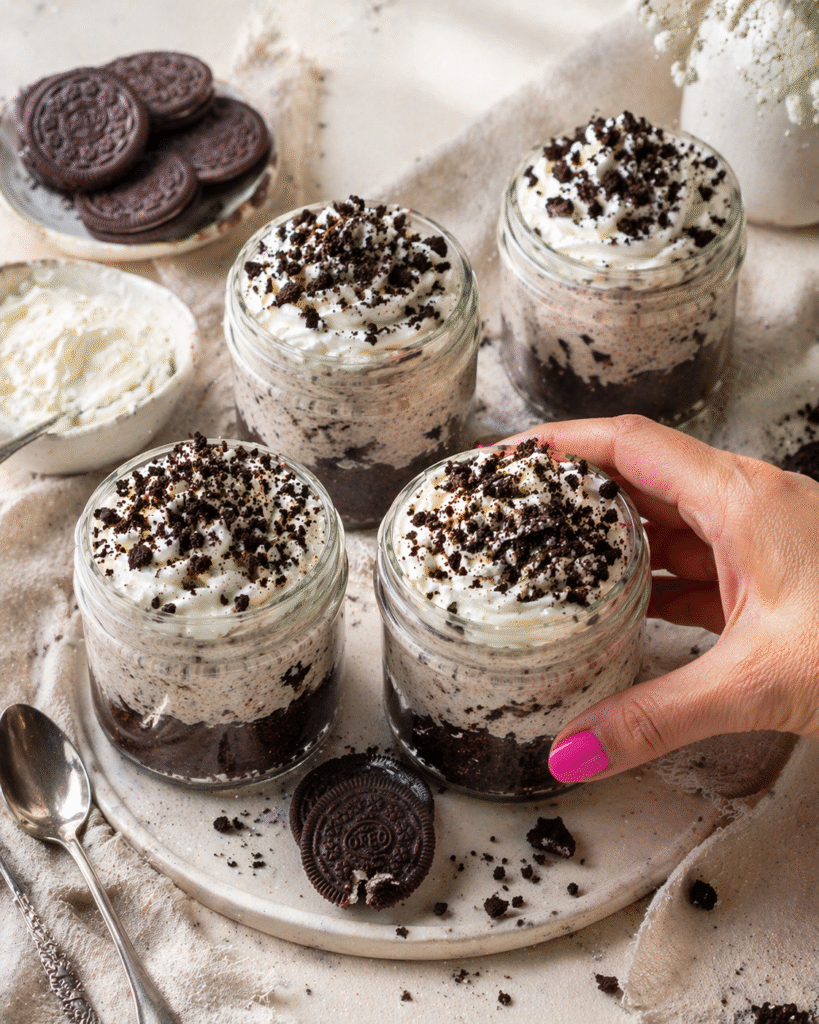
- 4 Small Jars / Ramekins / Cups (4–6 oz) – for serving
- Measuring Cups + Spoons
👩🍳 Step-by-Step Recipe Instructions
Yield: 4 cheesecake cups (or 1 small 6-inch cheesecake)
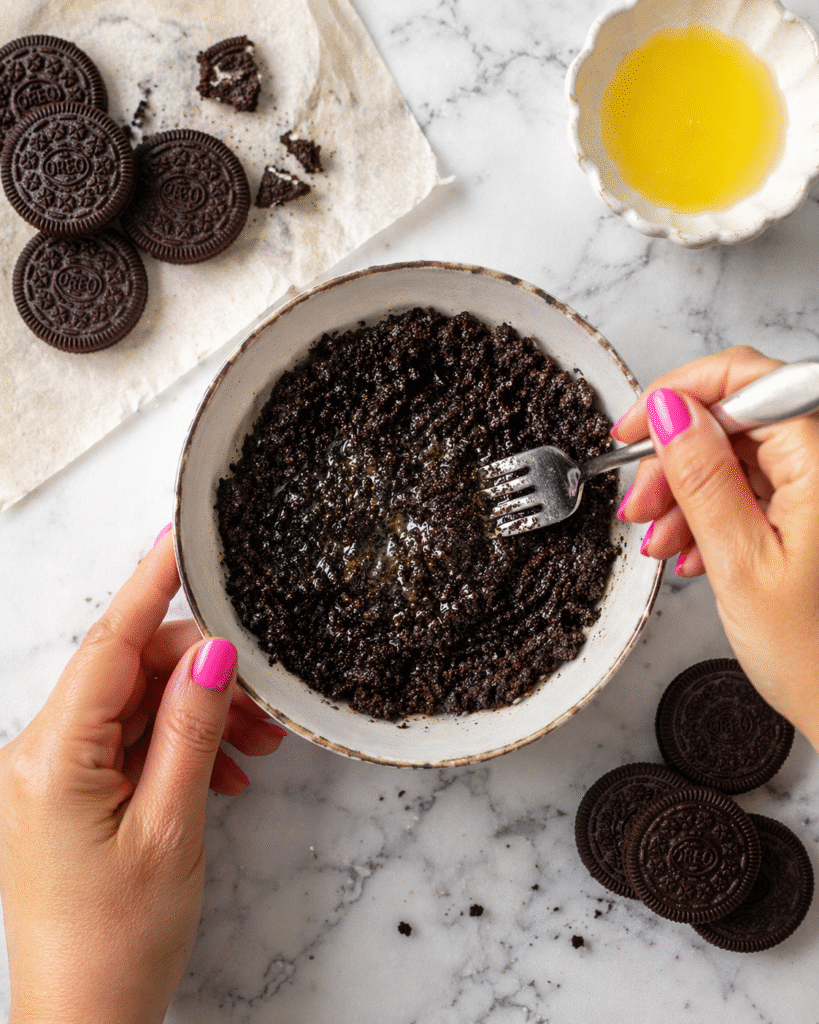
🍪 Step 1: Make the Keto Oreo Crust
Place your keto cookies in a zip-top bag (or between parchment paper) and crush them into fine crumbs—you want a soft, sandy texture, not big chunks.
Transfer to a bowl, add melted butter, and mix until it looks like wet sand.
Divide evenly between your cups (about 1–2 tbsp each) and press down firmly to create a compact base. Pop them in the fridge while you prep the filling.
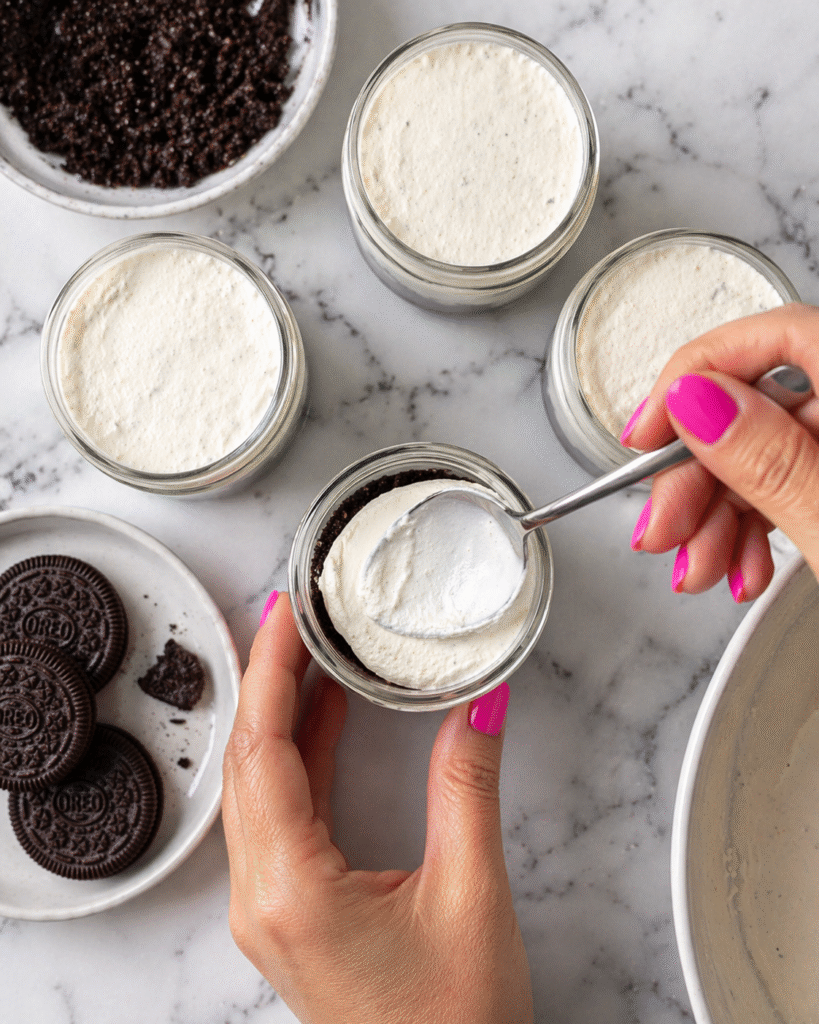
🌀 Step 2: Blend the Cheesecake Filling
This step? Do not rush it. Trust.
Add cottage cheese, cream cheese, powdered sweetener, vanilla, lemon juice, and optional heavy cream to your blender.
Blend on HIGH for 60–90 seconds until completely smooth and creamy—like thick pudding. No lumps, no curds, just silky perfection.
Scrape the sides if needed, then taste and adjust sweetness 👀

🍫 Step 3: Fold in Cookies & Cream Chunks
Crush your extra cookies into small chunks (not crumbs—you want texture).
Gently fold them into the filling using a spatula. Don’t overmix—you want those little cookie pockets throughout 😍
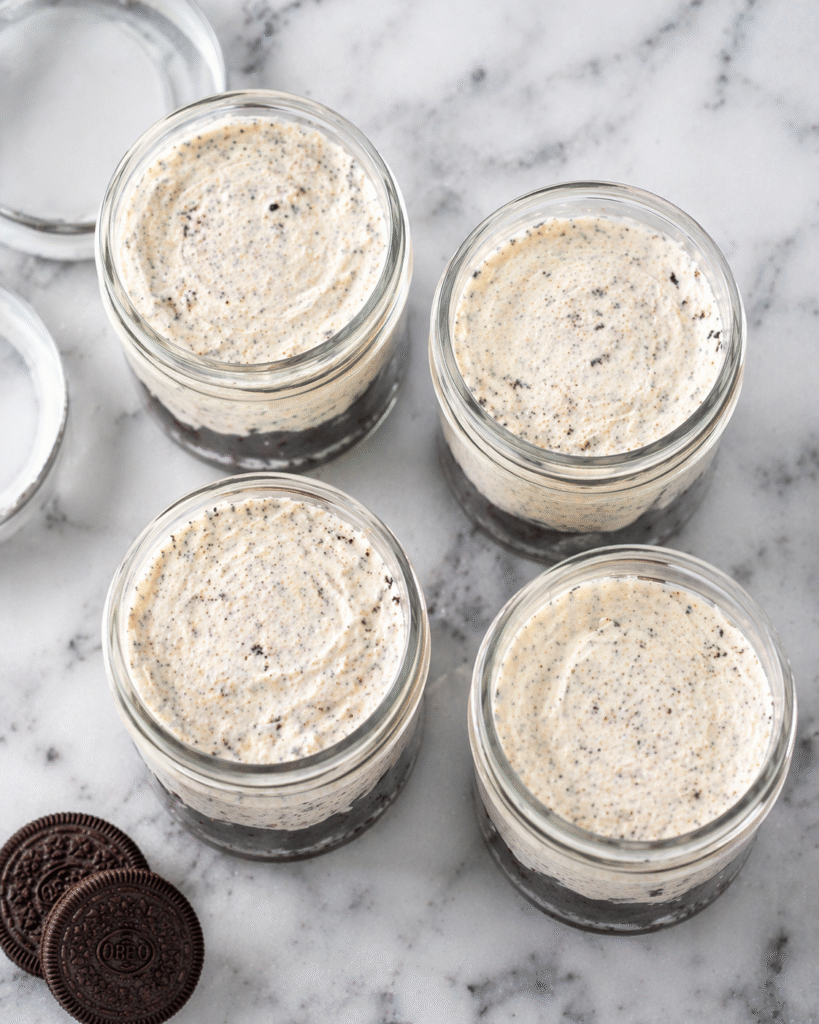
🥄 Step 4: Assemble the Cheesecake Cups
Take your crusts out of the fridge and spoon the filling evenly over each one.
Smooth the tops, then lightly tap the cups on the counter to remove air bubbles (optional but satisfying lol).
❄️ Step 5: Chill Until Set
Place in the fridge for at least 2–4 hours (overnight = even better).
The filling will firm up into that perfect creamy, sliceable cheesecake texture.
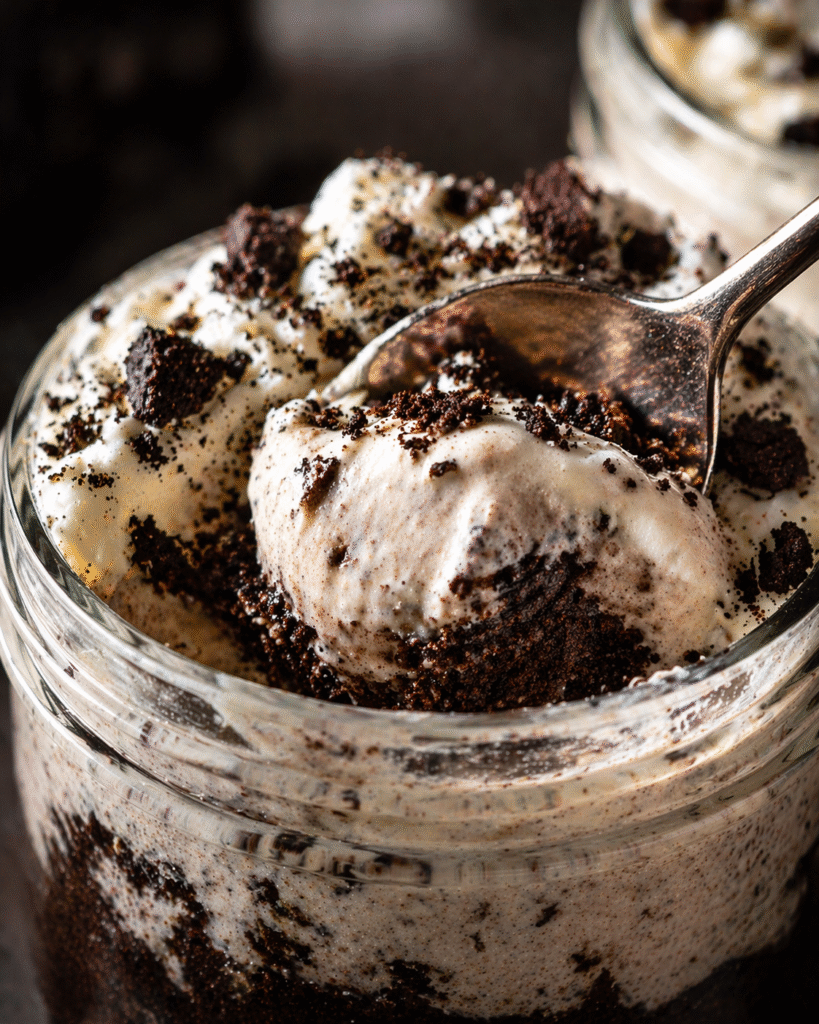
🍦 Step 6: Garnish & Serve
Right before serving, add your finishing touches:
- Sugar-free whipped cream
- Crushed keto Oreo crumbs
- Chocolate shavings
Serve chilled and prepare to be fully obsessed 😌🍪✨
⏱ Time Breakdown
- Prep Time: 15 minutes
- Chill Time: 2–4 hours
- Total Time: 2.25–4.25 hours (mostly hands-off 🙌)
📊 Nutritional Facts
(Per cheesecake cup — based on 4 servings)
- Calories: ~280
- Protein: ~15g 💪
- Carbohydrates: ~8g
- Fiber: ~3g
- Net Carbs: ~5g
- Fat: ~22g
- Sugar: ~3g
🏷️ Dietary Tags
Keto • Low-Carb • Gluten-Free (with GF cookies) • High-Protein • Vegetarian
🧊 Storage & Reheating Tips
🧁 Storage
Store your cheesecake cups in an airtight container in the fridge for up to 5 days.
They stay super creamy, set perfectly, and honestly taste even better the next day 👀
❄️ Freezing
These freeze beautifully—like meal prep queen behavior.
Place in an airtight container and freeze for up to 2 months.
When you’re ready, thaw overnight in the fridge and they’ll be just as creamy and delicious.
🔥 Reheating
None needed bestie—these are meant to be served cold and dreamy ✨
🥡 Meal Prep Tips
If you’re trying to stay on track and have dessert ready at all times… this recipe is about to be your best friend.
📅 Make Ahead Like a Pro
Prep all 4 cups at once and store them in the fridge—you’ve got a grab-and-go high-protein dessert ready for the next few days. No thinking, no cravings crisis.
🍪 Keep the Crunch Fresh
If you LOVE that crunchy Oreo texture, store extra crushed cookies separately and sprinkle them on right before eating.
(Soft + crunchy combo = elite 😮🔥)
🫙 Portion Control = Effortless
Making them in individual jars or cups = built-in portion control.
Each one is already perfectly balanced with ~15g protein, so you can just grab one and go.
❄️ Freeze for Later
Double the batch and freeze a few for future you. When that late-night craving hits? You’re already prepared 😌
🔁 Switch It Up
Don’t be afraid to rotate flavors each week:
- Chocolate peanut butter swirl 🥜
- Strawberry cheesecake 🍓
- Vanilla almond crunch 🌰
Same base recipe, totally different vibe—so you never get bored.
🍽️ Serving Suggestions
Serve these cheesecake cups chilled, straight from the fridge for that perfect creamy texture.
They’re honestly perfect for any occasion:
💪 Post-workout treat – high-protein and actually satisfying
🍰 Healthy dessert – no sugar crash, just vibes
🎉 Parties & gatherings – make them in mini jars for the cutest individual servings
💘 Valentine’s Day or date night – low effort, high impress factor
🎂 Birthdays – especially if you want something lighter but still indulgent
✨ Make It a Whole Moment
If you want to elevate things a bit…
Create a mini dessert board with:
- Fresh berries 🍓
- Sugar-free chocolate drizzle 🍫
- Extra crushed keto cookies 🍪
It looks fancy… but took you zero extra effort (we love that).
🍨 Fun Serving Ideas
- Crumble one over keto ice cream for a cookies & cream overload
- Layer into a dessert parfait with whipped cream and berries
- Add a drizzle of nut butter for a richer, indulgent twist
💡 Reader Tips & Helpful Notes
🔑 The Must-Know Tips
✨ Blend until COMPLETELY smooth
This is non-negotiable. Blend for a full 60–90 seconds until there are zero cottage cheese curds. Think silky, not lumpy.
🥛 Use full-fat everything
Full-fat cottage cheese + cream cheese = that rich, authentic cheesecake texture. Low-fat works… but it won’t hit the same.
🧀 Soften your cream cheese first
Let it sit out for about an hour. It blends way smoother and prevents lumps.
🍋 Don’t skip the lemon juice
It’s a tiny amount, but it adds that signature cheesecake tang that makes everything pop.
🍬 Use powdered sweetener
Granulated = gritty. Powdered = smooth, creamy perfection.
🍪 Press the crust firmly
A well-packed crust holds together better when you dig in (no crumb chaos).
❄️ Chill overnight if you can
It sets firmer and the flavor gets even better. Worth the wait, trust.
🍫 Fun Upgrade
Chocolate swirl moment:
Drizzle sugar-free chocolate sauce into the filling and swirl it with a toothpick before chilling. It looks fancy and tastes even better 😍
🚨 Common Mistakes (and how to fix them)
❌ Runny filling
Usually from not enough cream cheese or not chilling long enough.
👉 Fix: Add a bit more cream cheese next time + chill at least 4 hours.
❌ Grainy texture
Caused by not blending enough or using granulated sweetener.
👉 Fix: Blend longer + always use powdered sweetener.
❓ Recipe FAQs
Q: Can I taste the cottage cheese in this cheesecake?
A: Not even a little. Once blended with cream cheese, sweetener, and vanilla, it tastes like classic cheesecake filling—creamy, tangy, sweet, and SO good.
Q: Where can I find keto Oreo cookies?
A: Look for brands like HighKey, Catalina Crunch, ChocZero, or Lakanto. You can also DIY them if you’re feeling ambitious 👀
Q: Can I make this without the crust?
A: Yes! Skip the crust and turn these into cheesecake mousse cups—even lower carb and still delicious.
Q: Can I use a different cookie for the crust?
A: Absolutely. Try:
- Keto chocolate chip cookies 🍪
- Keto graham crackers
- Crushed nuts for a crunchier, lower-carb base
Q: Can I make this dairy-free?
A: You can try dairy-free cottage cheese + cream cheese alternatives. Not fully tested—but if you experiment, it could be a win 👀
Q: Can I make this in a larger pan instead of cups?
A: YES. Press the crust into a 6-inch springform or lined loaf pan, add filling, chill, then slice into bars or wedges.
Q: Why is my filling not setting?
A: Usually one of these:
- Not enough cream cheese
- Didn’t chill long enough
👉 Fix: Use full-fat cream cheese + chill at least 4 hours (overnight = best results)
Q: Can I add protein powder?
A: Yes! Add ½ scoop vanilla or chocolate protein powder.
You may need a splash of heavy cream to keep it smooth.
Q: Is this recipe keto-friendly?
A: 100%. About ~5g net carbs per cup (with keto cookies + sweeteners), so it fits perfectly into a keto lifestyle.
Q: How long do these last in the fridge?
A: Up to 5 days in an airtight container… but let’s be real, they’ll be gone way before that 😌🍪✨
Conclusion
And there you have it, bestie—the creamiest, most cookies-and-creamy, protein-packed no-bake dessert that’s about to become your new obsession. These Keto Cottage Cheese Protein Oreo Cheesecake Cups (15g Protein, No-Bake, Low-Carb!) are living proof that eating low-carb and high-protein doesn’t mean sacrificing the fun, indulgent desserts you love. That buttery, chocolatey crust, that silky, creamy cheesecake filling, those crunchy pockets of Oreo in every single bite—it’s everything you love about a classic Oreo cheesecake, made in your own kitchen with simple, wholesome, protein-packed ingredients, and absolutely no baking required.
The best part? You made them yourself, in minutes, and they taste BETTER than anything from a bakery. That’s the kind of dessert that keeps you consistent with your goals and fully satisfied.
I am SO excited for you to make these and experience that first creamy, cookies-and-cream bite 😍 When you do, come back and leave a comment or rating—I love hearing how they turned out for you!
Now go grab your blender and make some no-bake magic… this one’s about to be on repeat in your kitchen 🍪✨
Printable Recipe Card
Want just the essential recipe details without scrolling through the article? Get our printable recipe card with just the ingredients and instructions.


Comments