Table of Contents
Introduction
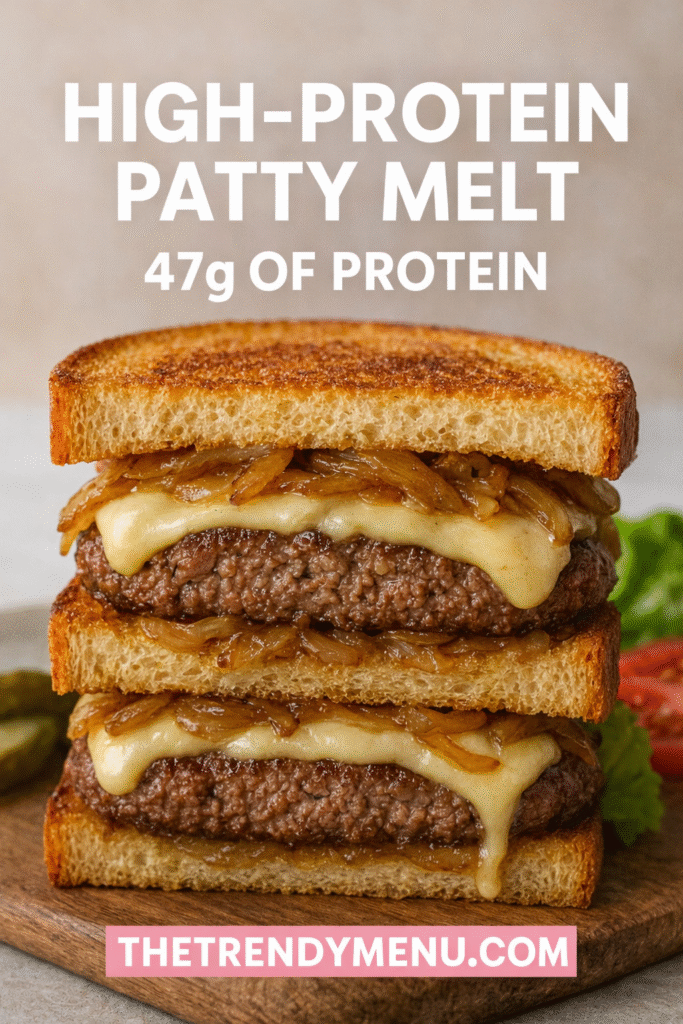
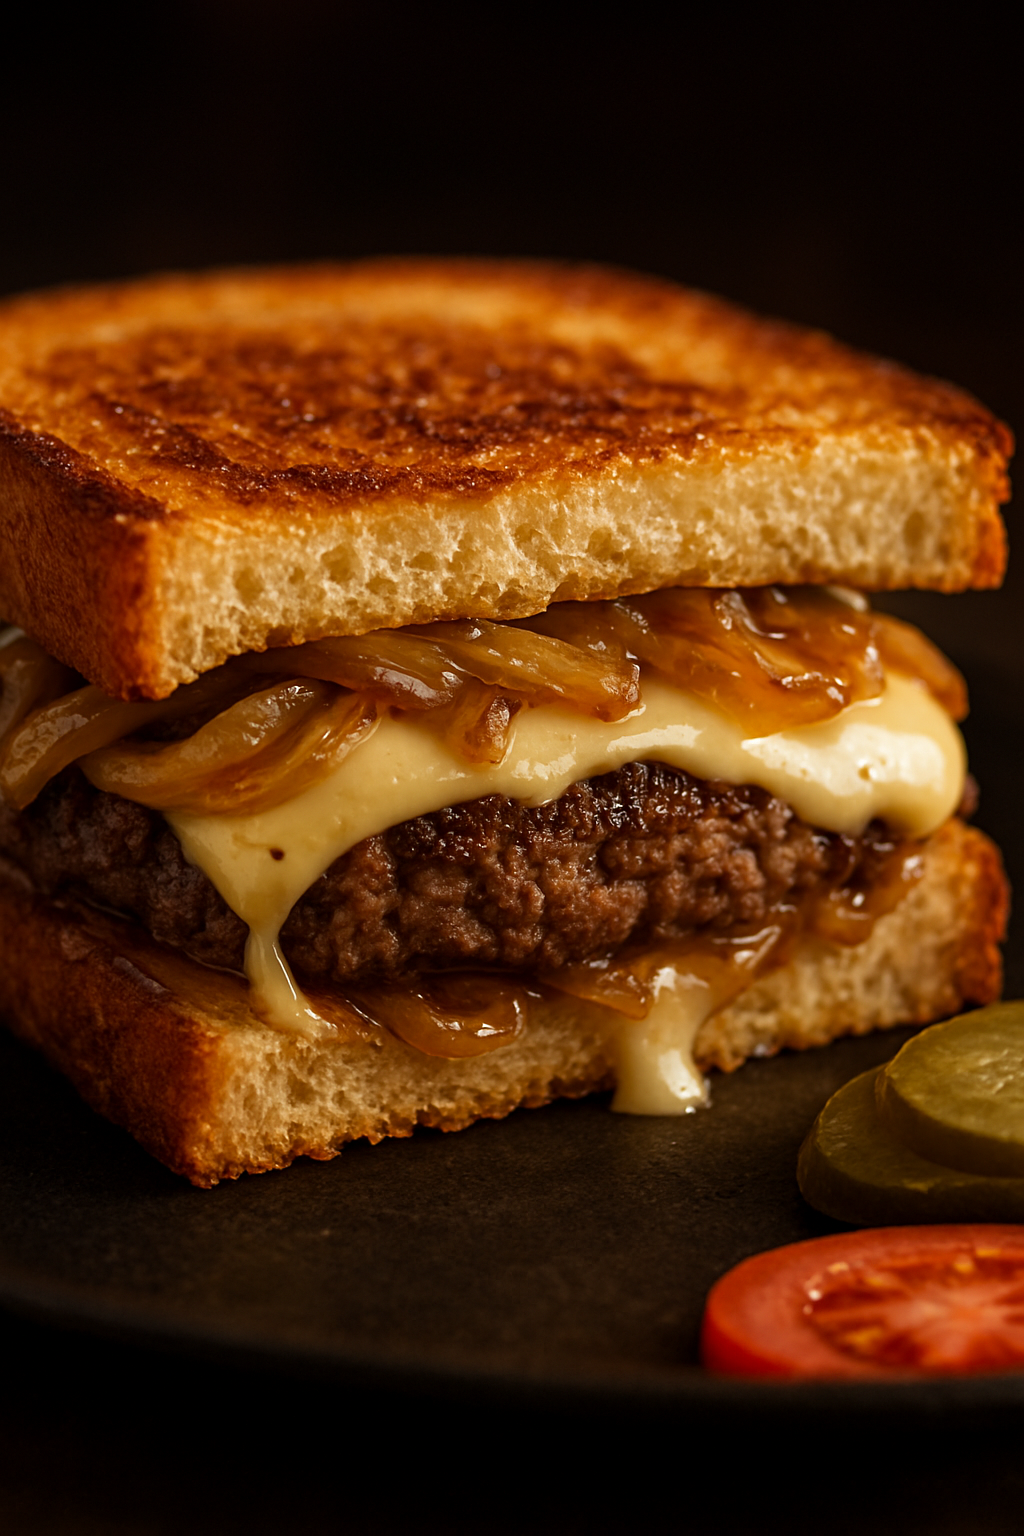
If you’re in your high-protein glow-up era but still craving cozy comfort food, bestie… you’re about to be obsessed. 💅✨ Meet your new favorite indulgence-meets-balance recipe: the High-Protein Glow-Up Patty Melt. This isn’t your average diner sandwich — it’s a protein-packed, melty, buttery, nostalgia-loaded classic that fits perfectly into a modern, feel-good lifestyle. With a whopping 47 grams of protein per serving, this patty melt proves you can eat comfort food and hit your macros. Period.
The patty melt has long been an American diner icon — a delicious hybrid of a cheeseburger and a grilled cheese — but we’re giving her a Trendy Menu makeover. Think juicy beef patties, sweet caramelized onions, and gooey Swiss cheese all hugged between perfectly toasted, buttery bread. Every bite is crispy, melty, savory, and straight-up soul soothing. It’s the kind of sandwich that feels indulgent but still aligns with your glow-up goals.
What makes this recipe extra special? It’s simple enough for weeknight dinners, impressive enough for hosting, and endlessly customizable. Whether you’re fueling up after a workout, feeding a hungry family, or just romanticizing your solo dinner at home, this high-protein patty melt delivers big flavor without the guilt spiral. You can even swap in leaner proteins or gluten-free bread if that’s your vibe — this recipe gets you.
So if you’ve been searching for the best high-protein patty melt recipe, a viral TikTok-worthy comfort meal, or just a reason to fall back in love with classic diner food — you’re in the right place. Let’s turn your kitchen into the coziest diner on the internet and make a sandwich that’s crispy, cheesy, juicy, and absolutely glow-up approved. 🧀🔥💖
Budget Information
Let’s talk budget bestie, because glow-up meals don’t need glow-up prices. 💅💸 One of the reasons this High-Protein Glow-Up Patty Melt is such a win is that it delivers big, diner-style flavor while staying totally wallet-friendly. You can make this cozy, protein-packed meal for around $15–$20, depending on your grocery store and any swaps you choose.
Here’s a quick cost breakdown so you know exactly what you’re working with:
-
Ground beef (1 lb): ~$4.00
-
Sliced bread (8 slices): ~$2.00
-
Onions (2 medium): ~$0.80
-
Cheese slices (Swiss or American, 4 slices): ~$2.50
-
Butter (4 tbsp): ~$0.50
-
Seasonings (salt, pepper, Worcestershire sauce): ~$1.00
-
Optional garnishes (lettuce, tomato, pickles): ~$3.00
Estimated Total: ~$15.80
Not bad for a 47g protein, diner-style comfort meal, right?! 🧀🔥 This recipe makes enough for multiple servings, making it perfect for feeding a hungry household, meal prepping for the week, or treating yourself to leftovers that somehow taste even better the next day.
Pro tip: You can stretch the budget even further by buying store-brand cheese, using bread you already have on hand, or swapping in lean ground turkey when it’s on sale. Affordable, filling, and glow-up approved — we love to see it. 💖✨
Why This Recipe Works
This High-Protein Glow-Up Patty Melt isn’t just delicious — it’s strategic. 💅✨ Every step, ingredient, and technique works together to give you maximum flavor, perfect texture, and serious protein without overcomplicating things.
It’s beginner-friendly but tastes chef-level.
No fancy techniques, no intimidating steps, and zero kitchen stress. You’re working with simple ingredients and a straightforward skillet method, which means even beginner cooks can nail this recipe on the first try — and feel like absolute pros while doing it.
The flavor balance is elite.
Juicy, well-seasoned beef brings the savory base, melted Swiss cheese adds rich creaminess, and those slow-caramelized onions bring just enough sweetness to take things over the top. Each bite hits salty, savory, buttery, and slightly sweet — the kind of combo that keeps you thinking about it hours later.
Texture is everything, and this recipe delivers.
Crispy, buttery bread on the outside. Gooey, melty cheese on the inside. A juicy patty that doesn’t dry out. This contrast is exactly what makes a patty melt unforgettable — and why this version feels diner-perfect every single time.
It’s flexible, customizable, and glow-up approved.
Want to switch up the protein? Ground turkey, chicken, or plant-based patties all work beautifully. You can adjust the cheese, use gluten-free bread, or lighten things up without sacrificing flavor. This recipe fits your lifestyle instead of forcing you into a food box.
Bottom line? This recipe works because it’s easy, indulgent, protein-packed, and endlessly adaptable — the kind of comfort food that actually supports your glow-up goals. Cozy, satisfying, and absolutely worth repeating. 🧀🔥💖
Ingredients + Optional Substitutions
Here’s your shopping list of what you’ll need for this High-Protein Glow-Up Patty Melt:
- Ground Beef (1 lb) – Can be substituted with ground turkey, chicken, or a plant-based meat alternative for vegetarian options.
- Sliced Bread (8 slices) – Classic white, whole grain, or rye are great choices; you can also use gluten-free bread if needed.
- Onions (2 medium, thinly sliced) – Yellow onions work wonderfully, but feel free to use sweet onions for a milder taste.
- Cheese (4 slices of Swiss or American) – Cheddar or pepper jack are fabulous alternatives for a bolder flavor.
- Butter (4 tbsp, softened) – You can replace this with olive oil or a dairy-free option for a lighter choice.
- Worcestershire Sauce (1-2 tbsp, optional) – For depth of flavor; can be skipped if unavailable.
- Salt and Pepper (to taste) – Bring on the flavor!
Optional Garnishes
- Fresh Lettuce
- Slices of Tomato
- Pickles for a tangy crunch!
Substitutions and Variations
One of the best things about this High-Protein Glow-Up Patty Melt is how easy it is to customize. Whether you’re working around dietary needs or just want to switch things up for fun, these swaps let you make the recipe your own — without sacrificing flavor. 💅✨
Keto Queen Swap:
Ditch the bread entirely and turn this into a keto patty melt stack — layer the beef patty, caramelized onions, and cheese between two crispy cheese “chaffles” or serve it open-faced over sautéed cabbage or zucchini for a low-carb, high-protein moment.
Gluten-Free Glow-Up:
Swap the bread for your favorite certified gluten-free slices, or go bun-less and wrap everything in crisp lettuce for a lighter, low-carb moment.
Vegetarian Vibes:
Skip the beef and use a thick, juicy portobello mushroom cap, a black bean burger, or your favorite plant-based patty. You’ll still get that savory, melty satisfaction with a veggie-friendly twist.
Dairy-Free Friendly:
Use dairy-free cheese slices and cook everything in olive oil or vegan butter. You’ll still get a golden crust and tons of flavor — no dairy required.
Tangy Flavor Upgrade:
Drizzle on a little BBQ sauce, burger sauce, or chipotle mayo for a smoky, crave-worthy kick that takes this melt to the next level.
Spicy Girl Era:
Add sliced jalapeños, crushed red pepper, or a splash of hot sauce directly into the patty or on top before serving for a bold, fiery finish.
No matter how you customize it, this recipe stays cozy, satisfying, and glow-up approved. Mix, match, and make it yours — because the best recipes are the ones that fit your vibe. 🔥🧀✨
Equipment
Before we get cooking, gather your special tools! Here’s what you’ll need:
- 12-inch skillet or frying pan
- Spatula for flipping the sandwiches
- Sharp knife for slicing onions and garnishes
- Measuring cups and spoons
- Butter spreader or table knife
- Cutting board
Step-by-Step Recipe Instructions
Yield:
4 servings (4 patty melts)
Ready to make melty, high-protein magic happen? ✨🍔 Follow these simple steps and you’ll have a crispy, cheesy, diner-worthy patty melt on the table in no time.
Step 1: Prepare the Patties
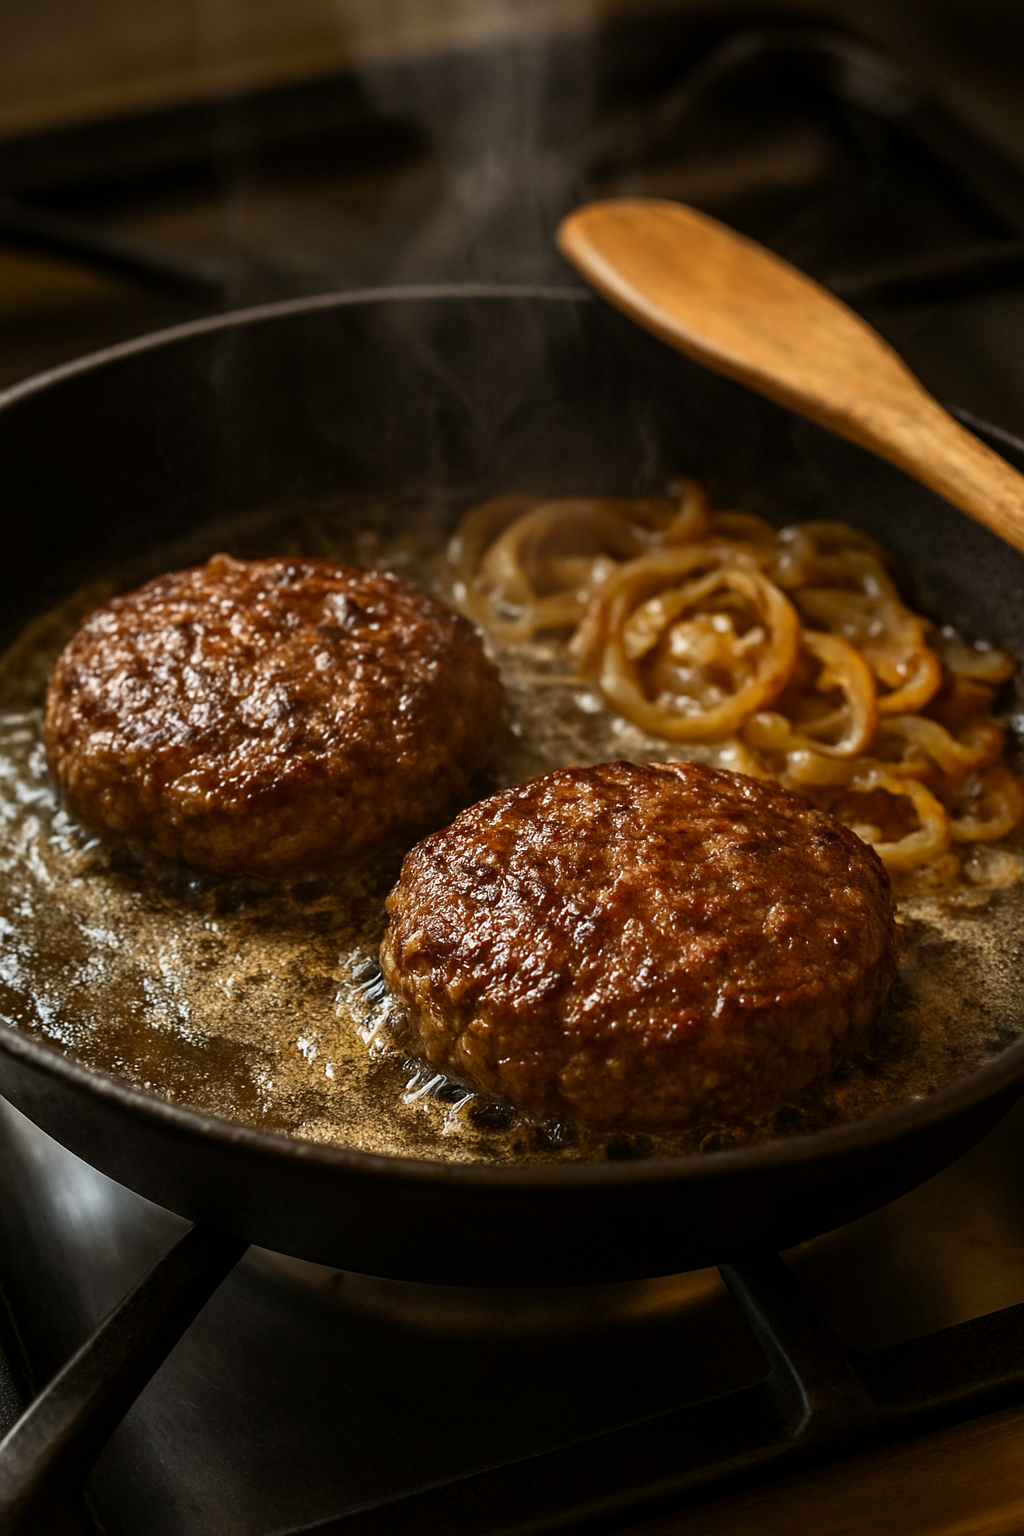
Start by dividing the ground beef into four equal portions and gently shaping them into patties roughly the same size as your bread slices. This makes assembly easier and ensures every bite is perfectly balanced.
Heat a 12-inch skillet over medium heat and add 1 tablespoon of butter. Once melted and sizzling, place two patties in the skillet. Season generously with Stone House seasoning (or a mix of salt, pepper, and garlic), then drizzle a little Worcestershire sauce over the top for extra depth of flavor.
Cook for about 4–5 minutes per side, flipping once, until the patties are beautifully browned and cooked through. Remove from the skillet and set aside on a plate to rest.
Pro tip: Using a lean but not ultra-lean beef blend keeps the patties juicy and prevents dryness.
Step 2: Caramelize the Onions
While the patties rest, it’s onion time — and trust me, this step is worth it. 🧅✨ Carefully wipe the skillet with a paper towel to remove excess grease, then add a little more butter if needed.
Add the thinly sliced onions and cook over low to medium heat, stirring occasionally, for 10–15 minutes. Let them slowly soften, brown, and caramelize until they’re golden, sweet, and irresistible. The smell alone will have everyone hovering in the kitchen.
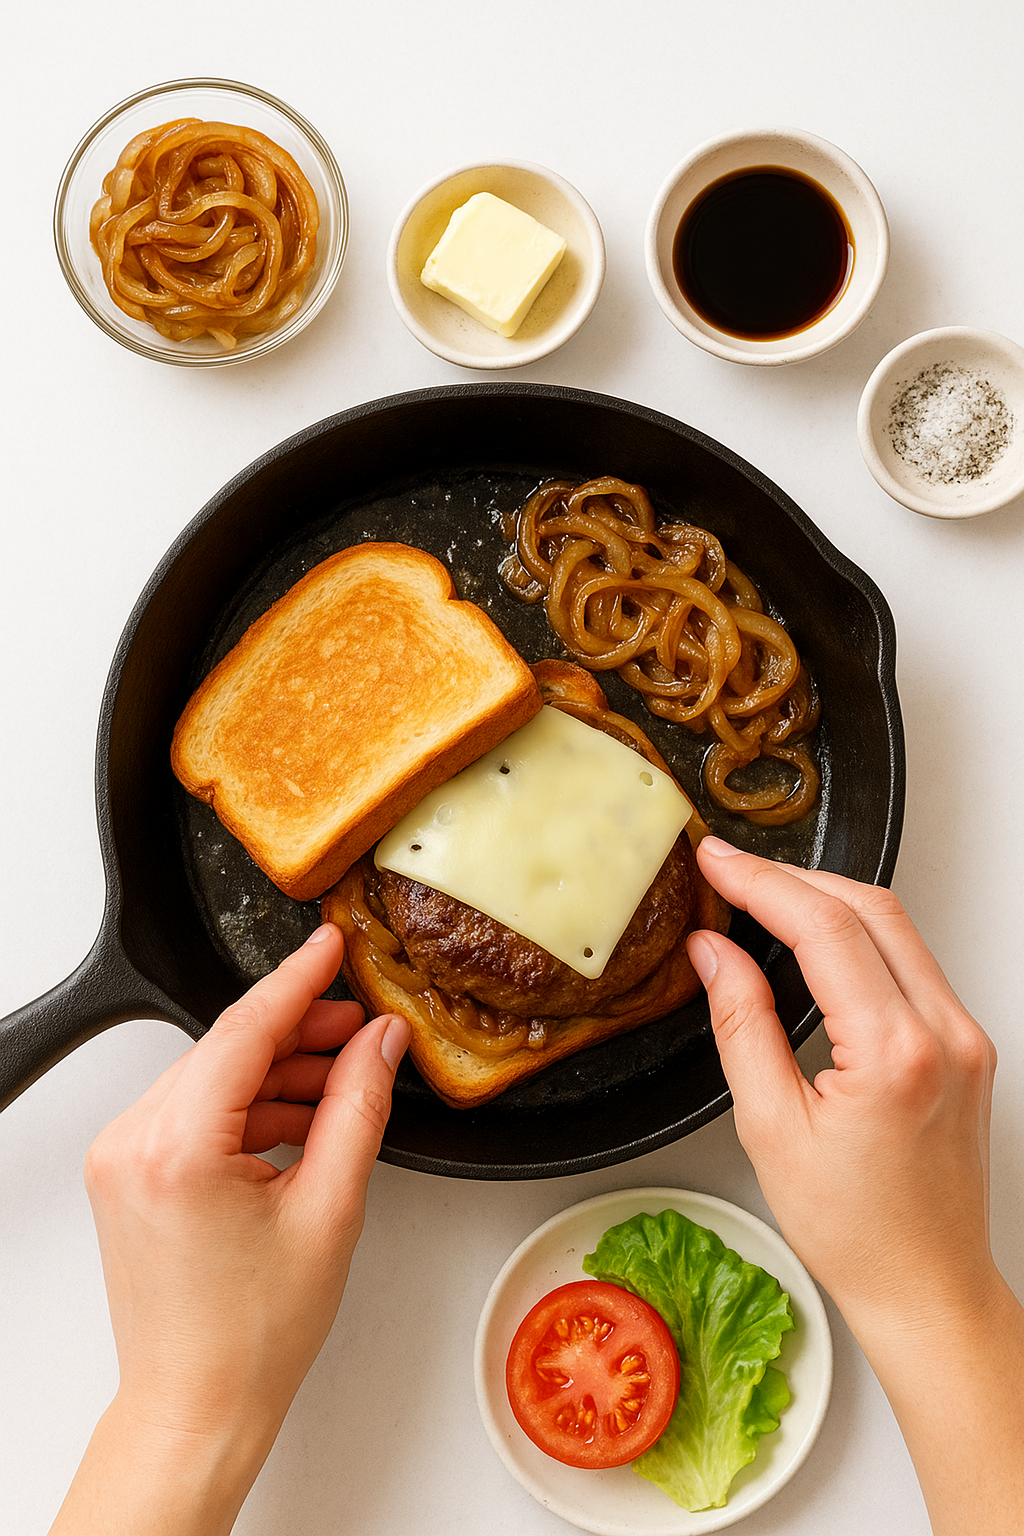
Step 3: Assemble the Patty Melts
Butter one side of each slice of bread, then place two slices butter-side-down into the skillet. Layer each slice with a generous spoonful of caramelized onions, followed by a beef patty, and then a slice of Swiss cheese.
Top with another slice of bread (unbuttered side facing up) and gently press down.
Hot tip: Assemble and cook the sandwiches in batches to keep everything warm and melty.
Step 4: Grill to Golden Perfection
Cook the sandwiches over medium heat for 2–3 minutes, or until the bottom slice is perfectly golden and crisp. Cover the skillet with a lid to help the cheese melt faster (this is where the magic happens 🧀🔥).
Carefully flip each sandwich, add a little more butter if needed, and grill the second side for another 2–3 minutes until golden brown and irresistibly crispy.
Step 5: Serve & Enjoy
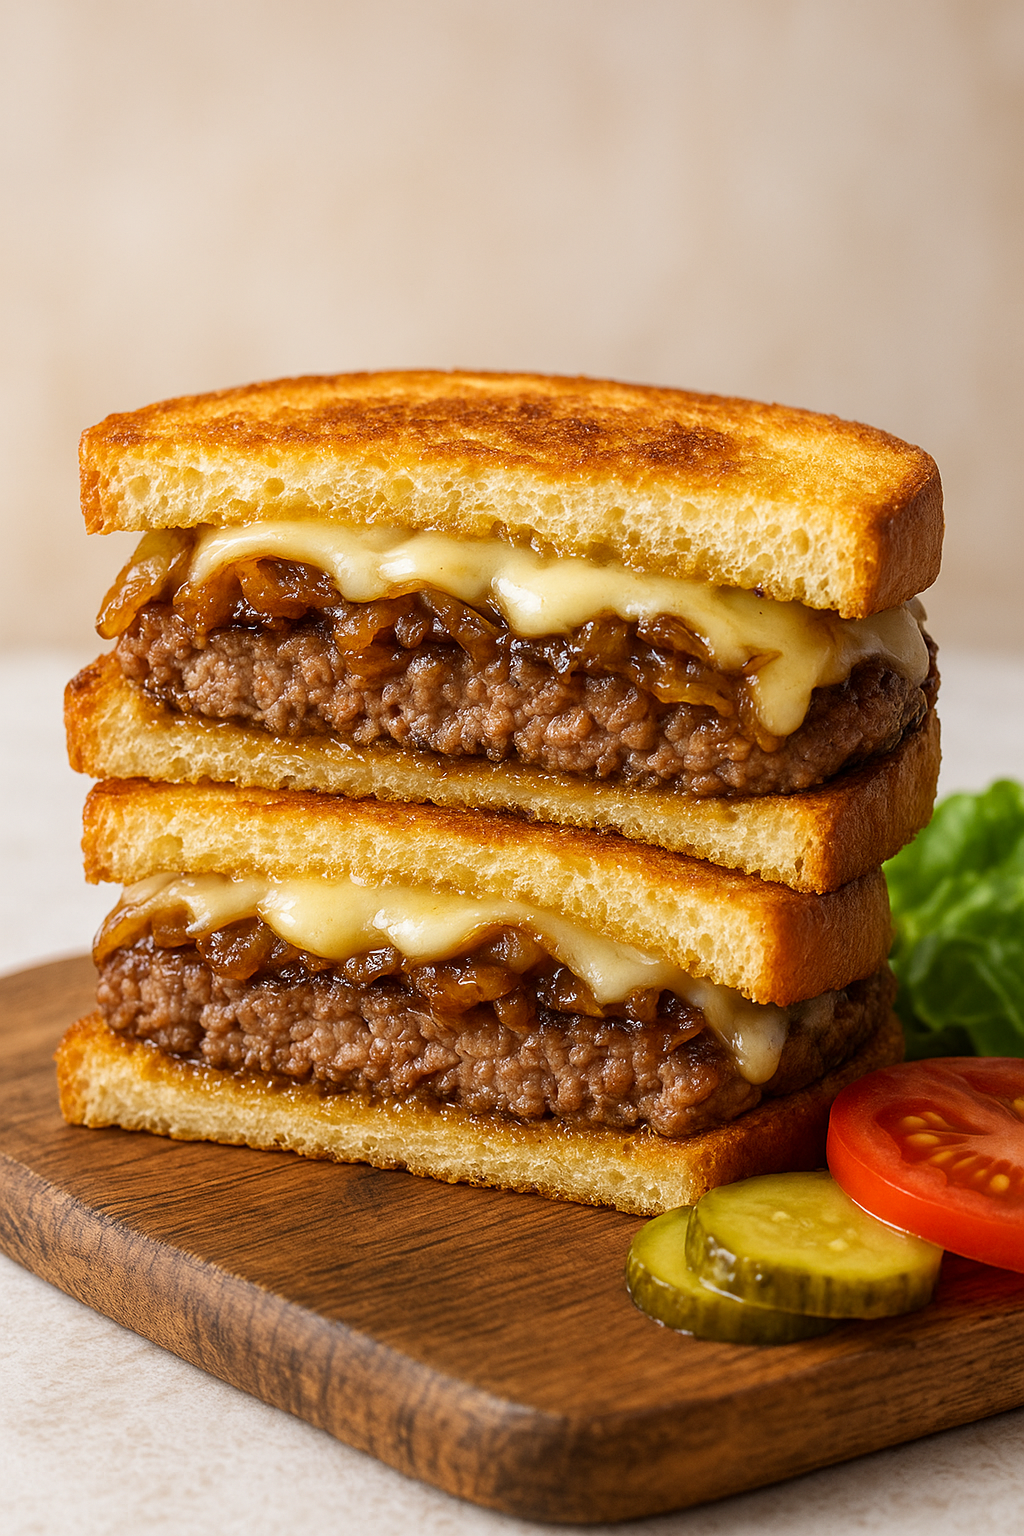
Transfer the patty melts to a cutting board and slice them in half for that Instagram-worthy cheese pull. Serve hot with optional garnishes like fresh lettuce, tomato slices, or pickles for a little crunch and freshness.
Congrats — you just made a High-Protein Glow-Up Patty Melt that’s crispy, cheesy, juicy, and absolutely worth the hype. 💖✨
Cook Time
Prep Time:
10 minutes
(shaping patties, slicing onions, prepping ingredients)
Cook Time:
20 minutes
(browning patties, caramelizing onions, grilling sandwiches)
Total Time:
30 minutes
Quick, cozy, high-protein, and totally doable for weeknights — just how we like it. 🧀🔥💖
Nutritional Facts
If you’re all about balance and hitting your goals, this one’s for you. 💪✨ The High-Protein Glow-Up Patty Melt delivers serious comfort food energy while packing in a whopping 47 grams of protein per serving.
Approximate nutrition per serving:
-
Calories: ~712
-
Protein: 47g
-
Carbohydrates: ~26g
-
Fat: ~46g
-
Fiber: ~1g
-
Sugar: ~1g
-
Sodium: ~800mg
Nutrition values are estimates and may vary based on ingredient brands, portion sizes, and substitutions.
Dietary Notes:
This recipe is naturally high-protein and can easily be made gluten-free, keto-friendly (by skipping the bread or using keto alternatives), or adapted to fit different dietary needs. Always double-check ingredient labels when making substitutions, especially for allergens or specialty diets.
Storage and Reheating Tips
Leftovers? Don’t worry, we’ve got you. Your High-Protein Glow-Up Patty Melt can stay just as delicious even the next day (or two… or three… we won’t judge). ✨🧀
Storage
-
Fridge Life: Store your patty melts in an airtight container for 3–4 days. They’ll stay fresh and ready for a quick reheat.
-
Freezer-Friendly: Want to save them for later? Wrap each sandwich tightly in plastic wrap or aluminum foil, then place in a freezer bag. They’ll keep for up to 2 months — perfect for meal prepping or future glow-up dinners.
Reheating
-
Microwave: Heat for 45 seconds to 1 minute. Quick and easy, though the bread may lose some crispness.
-
Oven: Bake at 350°F for 10–12 minutes. This brings back a golden, crispy crust while keeping the cheese melty.
-
Stovetop: Reheat over medium heat in a skillet, flipping once. Crispy, warm, and just like fresh off the skillet!
-
Air Fryer: Heat at 350°F for 3–4 minutes for ultra-crispy edges and gooey cheese — chef’s kiss. 😘✨
Whether you’re meal-prepping for the week or just treating yourself to leftover magic, these tips make sure every bite of your patty melt stays crispy, cheesy, and high-protein-approved. 💖🔥
Serving Suggestions
Ready to take your High-Protein Glow-Up Patty Melt to the next level? ✨🧀 Here’s how to serve it like a total pro (and make it Pinterest + TikTok-worthy):
Serve Hot & Gooey
There’s nothing better than biting into this sandwich while the cheese is perfectly melted and the bread is still crispy. Serve straight off the skillet for maximum melty magic, or let it cool slightly for a cozy, warm treat. 😍🔥
Perfect Pairings
Balance the rich, cheesy goodness with a side that complements the flavors:
-
Crispy fries or golden onion rings for a diner-style vibe
-
Refreshing green salad for a lighter, fresh crunch
-
Pickles or coleslaw for a tangy pop
Dipping Sauces & Flavor Boosts
Level up your patty melt experience with fun sauces:
-
Tangy BBQ sauce
-
Creamy ranch or garlic aioli
-
Classic ketchup or a spicy sriracha mayo
✨ Pro Tip: Turn this high-protein comfort food into a fun centerpiece for casual gatherings, weekend brunches, or TikTok food reels. A little garnish, a cute cutting board, and some cheese pulls = viral content energy. 💖
Reader Tips & Helpful Notes
Want to make your High-Protein Glow-Up Patty Melt even more magical? ✨🧀 Here are 10 fab tips from our Trendy Menu kitchen to elevate your sandwich game:
-
Don’t Rush the Onions: Patience is key! Slow-caramelized onions are golden, sweet, and totally addictive. 🧅✨
-
Mix Up the Meat: Blend ground beef with turkey or pork for extra flavor and juicy perfection.
-
Crispiness is Everything: Cook your sandwiches over low to medium heat for that perfectly golden, crunchy crust without burning. 🔥
-
Cheese Adventure: Mix cheeses like cheddar + Swiss for an indulgent, melty flavor explosion. 🧀💖
-
Butter Both Sides: For ultimate indulgence, lightly butter the inside of both bread slices before grilling.
-
Season Like a Pro: Don’t skimp on seasonings! A splash of Worcestershire sauce in your beef brings depth and savory magic.
-
Use a Burger Press: If you’ve got one, it ensures evenly shaped patties that cook perfectly every time.
-
Freeze Extras: Make a double batch and freeze for quick, protein-packed lunches or dinners later. ❄️
-
Garnish for Glam: Add fresh herbs, pickled veggies, or a slice of tomato for color, texture, and a Pinterest-worthy plate. 🌿
-
Quality Matters: Use fresh, high-quality beef and cheese — it makes every bite feel next-level.
✨ Pro Tip: Little tweaks like cheese blends, garnishes, or seasoning swaps can take your glow-up patty melt from delicious to TikTok viral.
Recipe FAQs
Q: What’s the best bread to use for a patty melt?
A: Go for hearty bread like rye or sourdough — they hold up beautifully against the beef and cheese, keeping your patty melt crispy and delicious.
Q: Can I make this recipe vegetarian?
A: Totally! Swap the beef for a veggie patty, black bean burger, or grilled mushrooms. You’ll still get that melty, savory goodness. 🌿✨
Q: Can I cook these on a grill?
A: Yes! Use a grill pan indoors or a BBQ outside to add a smoky flavor and those perfect golden grill marks. 🔥
Q: How do I prevent soggy bread?
A: Let the patties drain briefly after cooking, butter the bread well, and grill at medium heat. This keeps the crust perfectly crisp.
Q: What’s the ideal way to serve leftovers?
A: Reheat them in the oven, stovetop, or air fryer for best results. Or, if you’re feeling bold, enjoy cold for a quick high-protein snack! 😘
Q: Can I use grilled vegetables instead of meat?
A: Absolutely! Grilled zucchini, bell peppers, or portobello mushrooms make a flavorful, meat-free twist on this classic.
Q: Is a patty melt healthier than a burger?
A: It can be! Using lean ground beef, a lighter cheese, and fresh veggies makes this indulgent diner classic a high-protein, glow-up-friendly meal. 💖
Conclusion
And just like that, you’ve created your very own High-Protein Glow-Up Patty Melt! ✨🧀 Every bite is a crispy, cheesy hug that’s equal parts indulgent and protein-packed — perfect for solo indulgence, cozy nights in, or sharing with friends and family.
This recipe is flexible, fun, and totally customizable, so feel free to experiment, swap ingredients, and make it all your own. Tried adding a spicy kick? A tangy sauce? Or maybe a veggie twist? We want to hear about it! 💖
If you loved crafting your ultimate patty melt, drop a comment below, share your creation on social media, or tag us — we live for these glow-up foodie moments. And of course, subscribe to The Trendy Menu for more delicious, high-protein, and totally viral recipes heading your way. Let’s spread the yumminess together! 🍳✨
Happy cooking, stay cozy, and always keep sprinkling your life with a little extra flavor and love. 💕🔥
Printable Recipe Card
Want just the essential recipe details without scrolling through the article? Get our printable recipe card with just the ingredients and instructions.


Comments