Table of Contents
Introduction
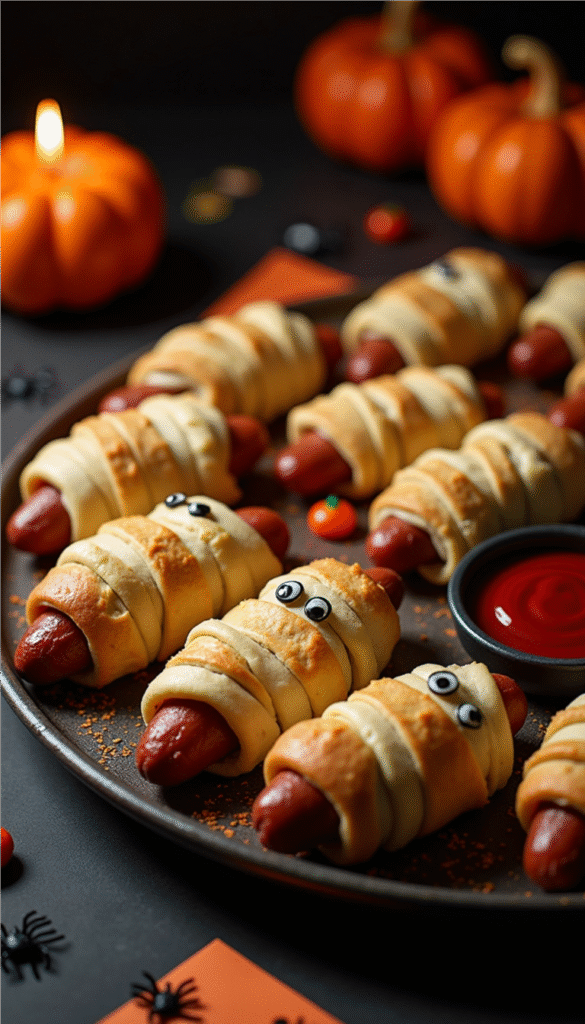
Hey there fabulous foodies and spooky seekers! 🎃 As Halloween creeps around the corner, it’s time to dig into some exciting, spook-tacular treats for your festive parties and cozy gatherings. Trust me, you’re in for a treat with our Easy Halloween Mummy Dogs—adorably eerie little delights that are a must-have this October! They’re just as fun to make as they are to eat, bringing a playful twist to your snack table and a smile to everyone’s face. Whether you’re hosting a haunted bash, planning a super chill movie night, or whipping up a family-friendly dinner, this recipe is a scream in the best possible way.
Now, let’s talk flavor because these Easy Halloween Mummy Dogs are not just about looks! Wrapped in flaky crescent roll dough, each bite offers a delightful contrast: the juicy pop of beefy hot dogs bursting with flavor, settled snugly in their golden, buttery blankets. They’re also customizable with your choice of toppings and dips—ketchup, mustard, or even a ghoulish green guacamole! This dish brings together the two worlds of food and fun seamlessly, serving as appetizers, party snacks, or even a unique dish for a Halloween dinner spread.
What makes our Easy Halloween Mummy Dogs especially fantastic? They cater to everyone, from little kids to the young-at-heart. This recipe is not only delightfully spooky but also straightforward enough for the entire family to join in on the creation. It’s about the fun of bonding and baking up some Halloween magic. So, gather around and get ready to enchant your taste buds! Now, let’s unravel the secrets behind these easy-to-make yet jaw-droppingly fabulous Halloween treats!
Why You’ll Love This Recipe
Why do our Easy Halloween Mummy Dogs stand out on any Halloween spread? First, they are just as much a feast for the eyes as they are for the tummy! Imagine the smiles when your guests see these cute, little mummies adorning your table! They’re perfect for kids and adults alike, embodying the playful spirit of Halloween while catering to a variety of taste preferences.
This recipe is a breeze for busy party planners or anyone looking to whip up a festive treat quickly. With only a few ingredients, it’s a no-stress choice that delivers a strong flavor punch. Plus, it’s incredibly flexible—you can swap out the beef hot dogs for turkey or veggie ones, making it a friendly option for various dietary preferences. The recipe’s simplicity and allure make it an unbeatable choice, ensuring you get both ease and favor with your party guests!
For those prioritizing health, these little mummies have their perks. You can opt for whole grain crescent rolls or nitrate-free hot dogs to boost the nutritional profile, offering you a less guilty option to enjoy this Halloween. They’re satisfying, savory, subtly sweet with the buttery dough, and simply scream festive fun.
Budget Information
Creating a batch of these Easy Halloween Mummy Dogs shouldn’t scare your wallet! Below is a basic costs breakdown for this delightfully spooky recipe. Prices may vary depending on your location and store, but generally, this is a cost-friendly dish!
- Hot Dogs (1 pack/8 pieces): $3.00
- Crescent Roll Dough (1 can): $2.50
- Mustard (optional, for eyes): $0.50
- Ketchup (optional, for dipping): $0.50
Approximate Total Cost: $6.50
There you have it! This recipe is budget-friendly and perfect for a crowd. It’s light on the wallet, using pantry staples and affordable products, yet heavy on fun and flavor. Perfect for family parties, school gatherings, or informal friendly contests, these mummy dogs prove that holiday treats can be deceptively simple yet utterly impressive.
Why This Recipe Works
What makes these Easy Halloween Mummy Dogs foolproof? For one, it’s how adorably spooky they can be without being a hassle to make. Done in less than 30 minutes, they make presenting a show-stopping dish effortless. The layering of crescent dough gives just enough insulation to keep the hot dog juicy while delivering that flaky, buttery pastry touch. This elevates each bite to give maximum satisfaction—soft, fluffy, and oh-so-delicious!
Apart from being easy to assemble, these mummy dogs are family-friendly, allowing the little ones to partake in the wrapping fun, letting their creativity translate into memorable Halloween creations. It’s all about making memories while munching on something mysteriously good! Additionally, adapting this recipe to dietary necessities like gluten-free or vegetarian alternatives won’t impact the spooky experience, maintaining the inclusivity of this Halloween sensation.
Ingredients + Optional Substitutions
- 8 hot dogs
- Substitute with veggie dogs for vegetarians.
- 1 can refrigerated crescent roll dough (8 oz)
- Substitute with gluten-free dough if needed.
- Mustard (for the eyes, optional)
- For a ghostly twist, try edible googly eyes (available at baking stores).
- Ketchup (for dipping, optional)
- Offer guacamole for a fun ghoulish dip.
Equipment
- Baking sheet
- Parchment paper
- Knife or pizza cutter
- Oven
- Small spoon or piping bag (for mustard eyes)

Step-by-Step Recipe Instructions
Servings Yield: 8 Mummy Dogs
1. Prepare your workspace by preheating the oven to 375°F (190°C).
As your oven warms up, line a baking sheet with parchment paper; this prevents sticking and makes cleanup a breeze. Unroll your can of crescent dough and gently press the perforations together to form a single sheet. Using a knife or pizza cutter, slice the dough into strips approximately 1/4 inch wide. These form the bandages for your mummies! With each strip, you will wrap around a hot dog, leaving a little gap for the face area. The rustic look multiples their authenticity—imperfect makes perfect mummies!
2. Take each hot dog and begin wrapping with dough strips.
Start at the end of the hot dog, leaving a tiny section for the face. Overlap the dough slightly and wrap until the entire hot dog resembles a mini mummy. Don’t hesitate to have fun with this part — the more some strips crisscross, the better the mummy appears. If you feel creative, angle the strips differently for a unique personality in each bite-sized piece.
3. Transfer your mummified creations to the prepared baking sheet.
Maintain a gap between them to ensure they bake evenly. Should any ‘bandages’ come loose during transfer, simple rearrangement is all it takes! Bake in your preheated oven for around 12-15 minutes or until golden brown—keep a close watch to achieve that beautifully bronzed crust.
4. Once baked and cooled slightly, adorn the mummy dogs with eyes.
Use a small dab of mustard as glue to stick the mustard or edible eyes onto the visible face of your mummies. If you’re using piping, squeeze gently to create quick eyes—borrowing their little charms in a flash! If you’ve got tiny helpers, this is a safe, fun task for them to tackle.
5. Plate the mummies beautifully on a festive platter.
Add small dipping cups of ketchup and any other fun dips like green avocado slime or spooky sriracha sauce, and you’ve got a spread worthy of a Halloween haunt! Entice them in with storytime; let each one become a character straight out of a mummy movie.
Prep Time: 10 minutes
Cooking Time: 15 minutes
Total Time: 25 minutes
Nutritional Facts
Per Mummy Dog serving:
- Calories: 200
- Protein: 7g
- Carbohydrates: 17g
- Fat: 12g
- Fiber: 1g
- Sugar: 3g
- Sodium: 540mg
Dietary Tags: Offers vegetarian and gluten-free variations.
Storage and Reheating Tips
Preserve these mummy dogs for future munching in a cinch:
- Fridge Duration: Up to 3 days in an airtight container.
- Freezer-Safe? Unfortunately, the texture post-freeze can suffer, so it’s not recommended.
- Best Containers: Airtight plastic or glass containers with sealing lids to lock in freshness.
Reheating Methods:
- Microwave: 10-20 seconds to heat through.
- Oven: Reheat at 350°F (175°C) for about 5 minutes for a crisper dough.
- Air Fryer: 325°F (160°C) for 2-3 minutes to maintain that delightful flaky texture.
The key to reheating these is maintaining their soft yet crispy texture without drying out the hot dog inside. The oven and air fryer are the prime choices, ensuring each reheated bite is as tasty as the very first.
Serving Suggestions
Serve these mummies while warm, so their bandaged appearance remains highlighted. Pair them with a range of dips like mustard, ketchup, or specialty sriracha for adults craving a little kick. Want to keep it cultural and cool? Offer a tangled web of rad sauces, or present a Halloween punch to wash them down. These lively mummy dogs also gracefully accompany a themed soup or veggie platter, catering to varied palates at any celebratory gathering.
Reader Tips or Helpful Notes
- Shortcuts: Use pre-cut dough strips available for quicker prep.
- Ingredient Upgrades: Nitrate-free hot dogs for a better quality option.
- What to Avoid: Beware of squeezing the dough too hard; it can tear easily.
- Tools Made the Process Easier: A pizza cutter slices the dough swiftly.
- Storage Hacks: Section with parchment between layers to avoid sticking.
- Flavor Boosts: Include a hint of garlic in the dough for aromatic flair.
- What’s Commonly Mistaken:Regard gaps in packaging as part of the charm, not imperfections.
- Seasoning Tweaks: Brush with egg wash for a sheen or sprinkle with sesame seeds for extra texture.
- Make-Ahead: Prepare the night before and store wrapped until ready to bake.
- Avoid Overcrowding: It’s critical for baking symmetry and that perfect golden finish.
Recipe FAQs
Are there vegetarian options for mummy dogs?
Absolutely! Sub veggie dogs for regular hot dogs and have a delicious experience that pleases all guests, vegetarians included.
Can gluten-free dough be used for wrapping?
Yes! Look for gluten-free crescent dough arr or make it at home with GF flour for sensitive eaters.
How do you keep the dough from slipping off during baking?
Moisture keeps dough secured! Gently press each wrap or use a small dab of water to hold dough initially, they will bake together perfectly.
Can I make them spicy?
For aficionados of heat, try spreading a thin layer of hot sauce before wrapping, and serve with more spice-tastic dips.
What’s the best method for piecing eyes accurately?
A piping bag or tiny zip-lock corner cut can help squeeze mustard with precision, ensuring expressive eyes every time!
Conclusion
Let me hear you say boo—because Easy Halloween Mummy Dogs are here to add extra spookiness to your celebration! As you dive into this recipe, get ready to spark joy, laughter, and a chance to make cherished Halloween memories that everyone will love. Easy, quirky, and ready to cater to a group of hungry ghouls or even your ghastliest family members, these mummy dogs bring a burst of flavor and creativity to your October festivities.
So, what are you waiting for? Float into this enchanting recipe that delights both eyes and taste buds. Don’t forget to leave love in the reviews, share your hauntingly creative variations with our amazing community, and tag us on social media with your mummy dog masterpieces. After all, the charm of these Halloween treats is far more than what’s wrapped in dough—it’s the connection, the fun, and the joy of bringing festive spirit to your table. Happy Halloween and eerie-eating to all fabulous foodies! 🎃


Comments