Now with a Protein-Packed Cheesecake Layer for a Guilt-Free Indulgence
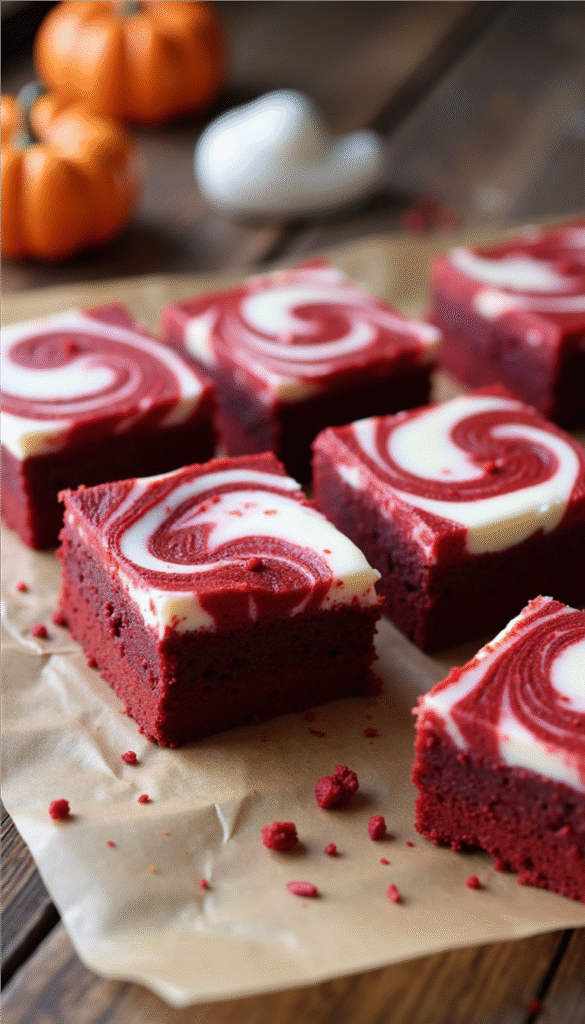
Table of Contents
Introduction
Indulging in a sweet treat is one of life’s simple pleasures, and when it comes to dessert, few combinations can rival the luxurious allure of red velvet and cheesecake. If you’re looking for a crowd-pleaser or a decadent way to excite your taste buds, look no further than these 5-Layer Red Velvet Cheesecake Brownies! This mouthwatering dessert combines the rich flavors of chocolate, the inviting tang of cream cheese, and the iconic crimson color of red velvet, creating a delightful treat that’s as beautiful as it is delicious.
The taste profile of these brownies is undeniably spectacular. The fudgy texture of the brownies pairs perfectly with the creamy cheesecake layer, creating a melt-in-your-mouth experience that’s hard to resist. Traditionally served at special occasions, parties, or just when the craving strikes, these brownies also make a fabulous dessert for a romantic date night or even a potluck gathering. Celebrate love, friendship, or even self-love by treating yourself to a slice (or two) of this decadent delight.
In this article, you’ll find a detailed recipe that guides you through every step of making these irresistible 5-Layer Red Velvet Cheesecake Brownies. From budget-friendly ingredient options to expert tips for perfecting your bake, we’ve got everything you need to make this treat an exquisite addition to your dessert lineup.
Budget Information
Creating a show-stopping dessert doesn’t have to break the bank! The approximate total cost for the ingredients needed to make these 5-Layer Red Velvet Cheesecake Brownies hovers around $9 or $0.60 per serving! The items are mostly pantry staples, making it easy for you to whip up this dessert without a hefty trip to the grocery store. With this recipe, you can satisfy the cravings of a large family or a gathering, making it an affordable choice, especially when serving multiple guests.
Brownie Layer
-
Granulated sugar – $0.15
-
Unsalted butter – $0.75
-
Unsweetened cocoa powder – $0.70
-
Protein powder (vanilla or chocolate) – $0.95
-
Red food coloring (optional) – $0.40
-
Vanilla extract – $0.20
-
White vinegar – $0.04
-
Salt – $0.01
-
Eggs – $0.65
-
All-purpose flour – $0.12
Protein Cheesecake Layer
-
Cottage cheese – $1.50
-
Whey protein powder – $2.25
-
Greek yogurt – $0.15
-
Egg – $0.33
-
Vanilla extract – $0.20
-
Sweetener – $0.12
Optional Garnishes
-
Whipped cream or Greek yogurt topping – $0.40
-
Cocoa powder dusting or chocolate shavings – $0.12
Approximate Total Cost: $9.69
Cost per brownie (16 servings): ~$0.61
Why This Recipe Works
These 5-Layer Red Velvet Cheesecake Brownies aren’t just your average dessert—they’re a showstopper! What makes them extra special is the perfect harmony between fudgy brownies, creamy protein-packed cheesecake, and that iconic red velvet flair. Each bite delivers layers of flavor and texture that are as gorgeous as they are indulgent.
This recipe is beginner-friendly yet feels ultra-gourmet, so whether you’re a first-time baker or a dessert pro, you’ll nail these beauties every time. Plus, with simple ingredient swaps—like protein powder for an extra nutritional boost or Greek yogurt to lighten the cheesecake layer—you can easily customize them to suit your diet without skimping on taste. Chocolate lovers, cheesecake fanatics, and anyone craving a rich, Instagram-worthy dessert will fall head over heels!
Why you’ll love these brownies:
-
Multi-layered and visually stunning—perfect for impressing friends
-
Rich, indulgent flavor without being overly sweet
-
Protein-packed option for a dessert that actually fuels you
-
Easy swaps for dietary preferences like gluten-free, dairy-free, or lower sugar
-
Foolproof recipe that guarantees bakery-quality results at home
Ingredients + Optional Substitutions
To bring these gorgeous 5-Layer Red Velvet Cheesecake Brownies to life, gather the following ingredients:
For the Brownie Layer:
- 1/2 cup (100g) granulated sugar – less sugar helps protein stand out.
- ½ cup (115g) unsalted butter, melted – Or coconut oil.
- 1/3 cup (30g) unsweetened cocoa powder
- 2 tbsp vanilla or chocolate protein powder – adds extra protein without changing flavor much.
- 1–2 tbsp red food coloring (optional)
- 1 tsp vanilla extract
- 1 tsp white vinegar
- ¼ tsp salt
- 2 large eggs
- ¾ cup (90g) all-purpose flour – slightly less flour helps keep protein dense.
For the Protein Cheesecake Layer:
- 1 cup (225g) cottage cheese, blended until smooth
- ½ cup (50g) vanilla or unflavored whey protein powder – protein-packed and creamy
- 1–2 tbsp Greek yogurt – adds creaminess and protein
- 1 large egg
- 1 tsp vanilla extract
- 1–2 tbsp sweetener of choice (sugar, erythritol, or monk fruit)
Optional Garnishes:
-
Whipped cream or Greek yogurt topping
-
Cocoa powder dusting or chocolate shavings
Equipment
Before diving into the recipe, ensure you have the following kitchen tools on hand:
- Mixing bowls (large and medium)
- Electric mixer (handheld or stand)
- Rubber spatula
- Measuring cups and spoons
- Baking sheet (9×9 inch recommended)
- Parchment paper (for easy removal)
- Knife or offset spatula (for swirling)
- Cooling rack (for cooling the brownies)
- Airtight storage container (for storing leftovers)
Step-by-Step Recipe Instructions
1. Preheat Your Oven:
Start by preheating your oven to 350°F (175°C). This step is crucial as it ensures your brownies bake evenly and rise to the perfect texture. While the oven is heating up, line a 9×9-inch baking pan with parchment paper, allowing some paper to hang over the edges for easier removal later. Greasing the pan with butter or cooking spray can also help prevent sticking, ensuring your decadent brownies come out flawlessly.
2. Prepare the Brownie Batter:
In a large mixing bowl, combine the melted butter and granulated sugar. Using an electric mixer, beat the mixture until it becomes smooth and creamy. This process typically takes about 1-2 minutes. Gradually add in the cocoa powder, food coloring, vanilla extract, and vinegar. Continue mixing until fully combined, and you can see no lumps of cocoa. Now, add in the eggs, one at a time, mixing thoroughly after each addition. Finally, sift in the all-purpose flour and salt, folding gently with a spatula just until combined. Avoid overmixing, as this can lead to tough brownies. The batter should look glossy and thick.
3. Reserve Batter and Prepare Cream Cheese Mixture:
Once the brownie batter is ready, set aside about 1/4 cup for later use. Pour the remaining batter into your prepared pan, spreading it evenly.
For the protein-packed cheesecake layer, blend the cottage cheese until smooth in a medium mixing bowl. Then beat in the whey protein powder, Greek yogurt, egg, vanilla, and sweetener until creamy and lump-free. The texture will be slightly lighter than traditional cream cheese, but just as luscious and perfect for layering.
4. Layer the Cheesecake Filling:
Once the brownie layer is in the pan and the cheesecake filling is smooth, dollop spoonfuls of the cream cheese mixture over the brownie batter, spacing them out evenly. Take the reserved brownie batter you set aside and drizzle it over the cream cheese layer in small dollops. This layering creates the stunning five layers that make this dessert so special.
5. Swirl for a Beautiful Effect:
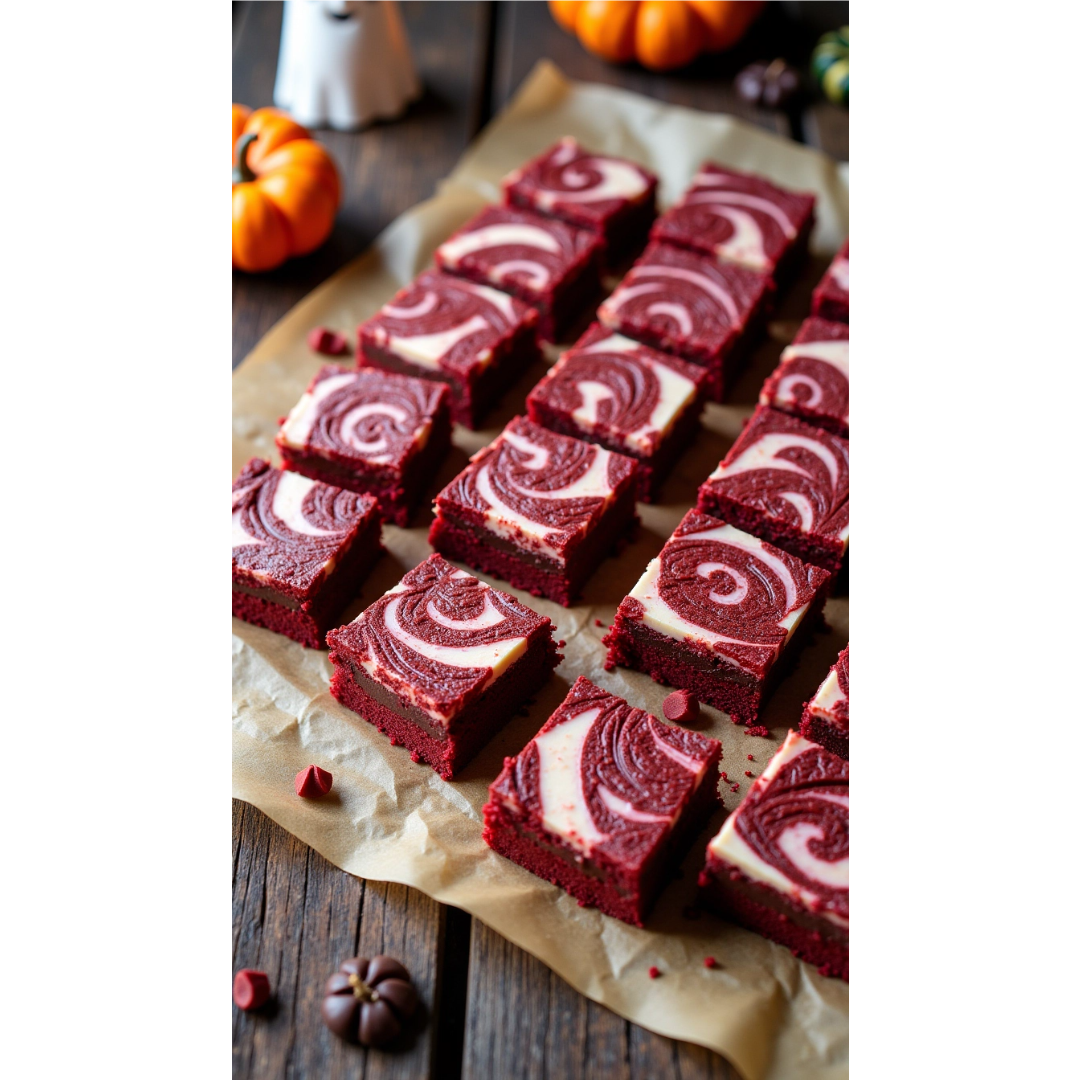
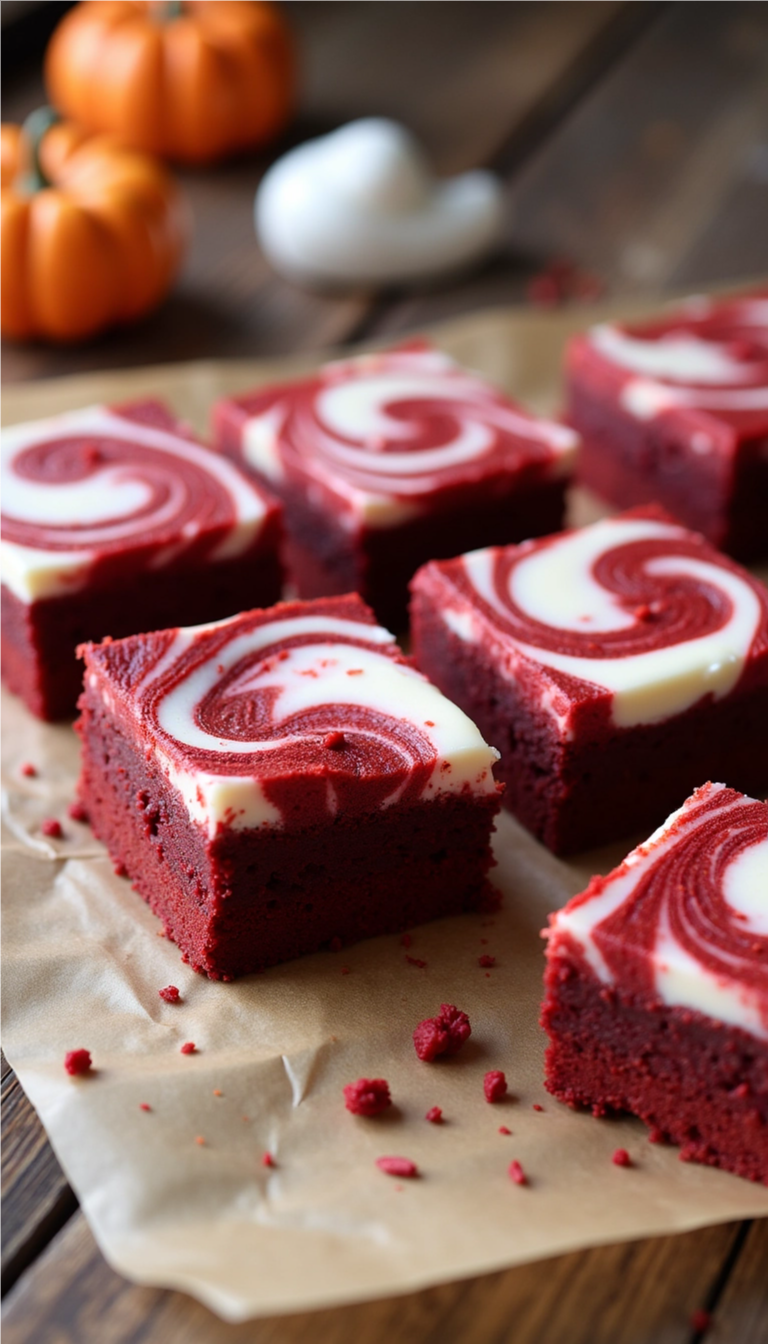
Using a knife or a skewer, gently swirl through the layers to create beautiful marbled patterns. Be careful not to overmix; you want to maintain some distinct red velvet brownie and creamy cheesecake contrast. This step is visually stunning and gives your brownies that bakery-quality finish that will impress everyone.
6. Bake to Perfection:
Place the pan in the preheated oven and bake for 25-30 minutes. You can check for doneness using the toothpick test—insert a toothpick into the center, and if it comes out with a few moist crumbs (but not wet batter), they’re ready to come out. Watch carefully as overbaking can lead to dry brownies. When the baking time is up, remove from the oven and let the brownies cool in the pan on a wire rack.
7. Cool and Slice:
After about 30–45 minutes of cooling, lift the brownies out of the pan using the parchment paper overhang. Brimming with anticipation, cut them into squares or rectangles as desired. You’ll want to see that creamy cheesecake swirl in every piece, making it a feast for both the eyes and palates!
8. Serve and Enjoy:
Serve your decadent brownies at room temperature or chilled, and consider adorning them with a dollop of whipped cream or a sprinkle of chocolate shavings. These attractive details bring the whole dessert together and make it an instant celebration.
Nutritional Facts
Indulging in your 5-Layer Red Velvet Cheesecake Brownies won’t leave you feeling guilty. Here’s a breakdown of the approximate nutrition per serving (assuming 16 servings):
- Calories: ~190–210
- Protein: 12–13g 💪
- Carbs: 20–25g
- Fat: 10g
- Fiber: 1–2g
- Sugar: 10–12g
These brownies are perfect for celebrations and delightful sweet cravings, but be sure to enjoy them in moderation. They contain gluten and dairy due to their brownie and cheesecake layers.
Storage and Reheating Tips
To store your leftover 5-Layer Red Velvet Cheesecake Brownies, keep them in an airtight container in the refrigerator, where they will stay fresh for about one week. If you’d like to relish these delectable treats for longer, they can be frozen! Simply wrap each brownie tightly with plastic wrap followed by aluminum foil, and store them in a freezer-safe container. They’ll keep well frozen for up to two months. When you’re ready to enjoy them, thaw the brownies in the fridge overnight or at room temperature for a few hours.
Reheating Methods:
- Microwave: Place a brownie on a microwave-safe plate and heat in 10-15 second intervals until warmed through, being cautious not to make it overly hot or dry.
- Oven: Preheat the oven to 350°F (175°C) and wrap brownies in foil. Bake for about 10 minutes to restore moisture and warmth.
- Stove: For a quick reheat, place the brownie in a non-stick skillet over low heat, covering with a lid. Warm gently until soft.
With these storage and reheating tips, you’ll preserve the delightful texture and flavors of your decadent dessert, ready for yet another delightful experience!
Serving Suggestions
These 5-Layer Red Velvet Cheesecake Brownies are delightful on their own, but you can elevate the experience with a few serving suggestions:
- Top with whipped cream: A light, airy topping complements the rich chocolate and creamy layers.
- Sprinkle with chocolate shavings or crushed nuts: These enhancements add texture and depth of flavor, elevating the visual appeal.
- Pair with coffee or tea: The chocolatey, rich flavors of the brownies harmonize wonderfully with a cup of coffee or flavored teas.
- Add a scoop of vanilla ice cream: Serve warm brownies with a scoop of ice cream for an irresistible warm and cold combination that brings the whole dish to new heights.
Variations are also plentiful—try drizzling warm chocolate ganache over the top for a truly decadent treat, or serve with raspberry sauce to introduce a tart contrast to the sweet brownie.
Reader Tips or Helpful Notes
To ensure your journey with these 5-Layer Red Velvet Cheesecake Brownies is seamless and enjoyable, check out these helpful tips:
- Shop for Fresh Ingredients: Ensure your cream cheese, eggs, and dairy products are fresh for the best taste.
- Room Temperature Ingredients Are Key: Let cream cheese and eggs come to room temperature before mixing for the most consistent results and easier blending.
- Use Quality Cocoa Powder: Choose high-quality unsweetened cocoa for a rich, deep chocolate flavor that enhances the outer brownie layer.
- Do Not Overmix the Batter: Gently combine ingredients to keep the brownies moist and fluffy; overmixing can lead to a dense texture.
- Consider Double or Half Recipes: Adjust your batch size based on your gatherings or cravings—this recipe can easily be multiplied or halved.
- Chill for Better Cutting: For cleaner cuts, refrigerate brownies for an hour before slicing; this firming effect makes them easier to cut into neat squares.
- Explore Flavor Add-Ins: Consider adding chocolate chips to the brownie layer or folding in chopped nuts for added texture and flavor variety.
- Store Properly: Always keep these brownies stored in an airtight container to maintain moisture and freshness.
- Use Food Coloring Cautiously: If you’re sensitive to coloring agents, you can omit the red dye without sacrificing flavor; the cocoa will create a delicious chocolate brownie!
- Experiment with Extracts: Swap out vanilla extract for almond or mint extract to explore different flavor dimensions in your brownies.
Recipe FAQs
Here are some frequently asked questions to help clarify any uncertainties as you embark on your baking journey:
-
Can I make this ahead of time?
Absolutely! These brownies can be made a day or two in advance and stored in the refrigerator. They often taste even better after the flavors have mingled. -
Can I freeze it?
Yes, these brownies freeze exceptionally well! Store them properly as described, and you can enjoy a slice any time. -
How can I make it vegan/gluten-free?
For a vegan version, substitute the eggs with flax eggs and use dairy-free cream cheese. Gluten-free flour can replace regular flour for a gluten-free option. -
Can I double the recipe?
Yes, feel free to double the ingredients and use a larger pan. Remember to adjust the baking time accordingly; you may need a few extra minutes. -
Is it spicy/kid-friendly?
This dessert is not spicy at all; it’s a sweet treat that’s perfect for families and kids! -
What are the best storage containers?
Use shallow, airtight containers for optimal freshness, or wrap individual brownies for on-the-go snacks. -
How long can I leave it out before refrigerating?
For food safety, do not leave brownies at room temperature for more than 2 hours, especially in warm environments. -
Can I use an air fryer/Instant Pot instead?
Brownies can be baked in an air fryer, just make sure to adjust the temperature and bake time (generally at 300°F for about 10-15 minutes). -
What are the most common mistakes to avoid?
Overbaking and not allowing enough cooling time are some of the most common pitfalls; make sure to follow the steps closely for a successful end product. -
How do I scale this for a party or meal prep?
You can easily scale the recipe for bigger gatherings by adjusting the amounts of each ingredient and using larger pans. Just keep an eye on the baking time!
Conclusion
These 5-Layer Red Velvet Cheesecake Brownies are more than just a dessert—they’re a celebration in every bite. With their fudgy brownie base, creamy protein cheesecake layer, and decadent red velvet charm, they’re the perfect treat to enjoy with friends, family, or even as your own little self-care moment.
Grab your mixing bowls, preheat your oven, and get ready to create a dessert that’s as fun to make as it is to eat. Don’t forget to share your creations on social media, tag your foodie friends, and drop a comment below to let me know how your brownies turned out—I love seeing your baking magic in action! Happy baking, loves! 💖✨
✨ Loved this recipe? Don’t keep it to yourself! ✨
💖 Drop a comment below and tell me how your 5-Layer Red Velvet Cheesecake Brownies turned out—I love seeing your baking creations!
📌 Feeling inspired? Pin this recipe to your dessert board so you can whip it up anytime you need a chocolate + cheesecake fix. Trust me, your future self will thank you!
Printable Recipe Card
Want just the essential recipe details without scrolling through the article? Get our printable recipe card with just the ingredients and instructions.


Comments